SharePoint Mentor Curated Articles
Adding, Configuring, and Leveraging Metadata Columns in SharePoint Online
1. Introduction to Metadata in SharePoint Online
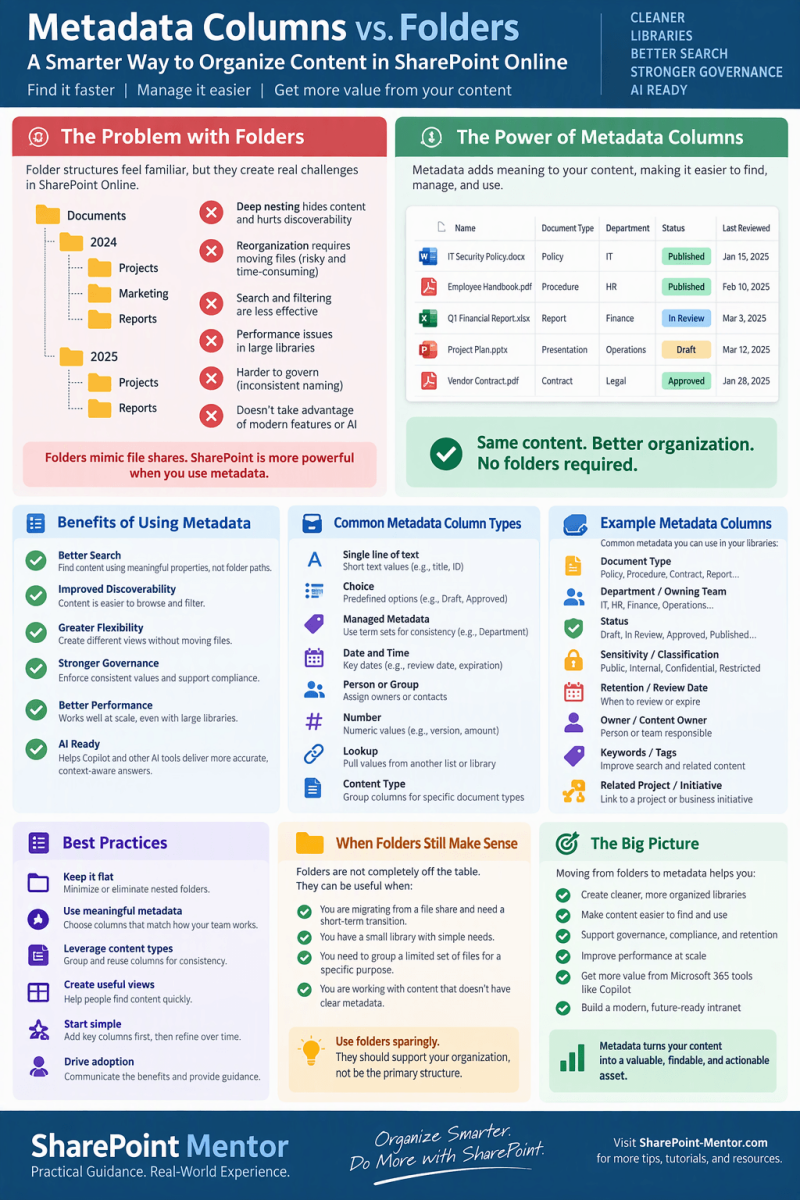
Metadata is structured information about content that describes, classifies, and makes it discoverable. In SharePoint Online, metadata is primarily captured through columns (also called fields) on lists and document libraries. Well-designed metadata is the foundation of effective information architecture, search, filtering, views, retention, and Copilot readiness.
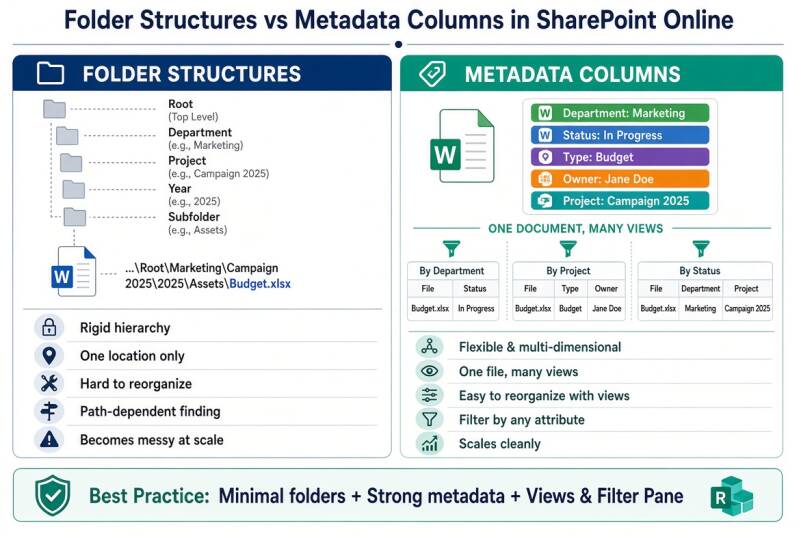
Unlike deep folder hierarchies, metadata enables a single document or list item to appear in multiple logical views without duplication. Users can filter, group, and sort by attributes such as Department, Document Type, Status, Project, Owner, or Retention Category.
Key benefits of metadata-driven organization:
- Faster findability through filtering, grouping, and search refiners
- Consistent classification across libraries and sites
- Support for content types, retention labels, and sensitivity labels
- Improved Microsoft Search and Copilot responses
- Reduced reliance on fragile folder structures
2. Column Types Suitable for Metadata
- SharePoint Online provides many column types. The most useful for metadata tagging and classification are listed below.

Recommendation: Use Choice columns for simple, list-specific values. Use Managed Metadata when the same vocabulary must be shared across many lists, libraries, or sites, or when hierarchy is required.
3. How to Add Metadata Columns
3.1 Adding a Column Directly to a List or Library (Modern Experience)
This is the fastest method for list-specific or library-specific columns.
- Navigate to the list or library.
- In the modern view, locate the last column header and select + Add column (or the + icon).
- Choose a column type from the panel (Choice, Person, Date and time, Yes/No, Managed metadata, etc.).
- Enter a clear Column name and optional Description.
- Configure the type-specific settings (choices, term set, default value, required, multiple values).
- Select Save. The column appears in the default view.
Tip: Select “See all column types” at the bottom of the panel to access Calculated, Hyperlink, Lookup, and other less common types.
3.2 Creating Site Columns (Recommended for Reuse)
Site columns are defined once at the site (or site collection) level and can be added to multiple lists, libraries, and content types. This promotes consistency.
- Go to the site (preferably the root site of the site collection for maximum reuse).
- Select the gear icon → Site information → View all site settings (or Site contents → Site settings).
- Under Web Designer Galleries, select Site columns.
- Select Create.
- Enter the Column name and select the information type.
- Choose or create a Group (e.g., “Contoso Metadata”) to keep columns organized.
- Configure Additional Column Settings (description, required, unique values, default value, etc.).
- Select OK.
3.3 Adding an Existing Site Column to a List or Library
- Open the list or library.
- Select the gear icon → List settings or Library settings (or Settings → Library settings / List settings).
- In the Columns section, select Add from existing site columns.
- In the Select site columns from dropdown, choose the group containing your column.
- Select the desired column(s) and click Add.
- Optionally check Add to default view and Add to all content types.
- Select OK.
4. Configuring Metadata Columns
4.1 Common Configuration Options
Most column types support these settings:
- Description: Help text shown to users on forms.
- Require that this column contains information: Makes the field mandatory.
- Enforce unique values: Prevents duplicate entries in the column.
- Default value: Pre-fills the field for new items.
- Add to all content types / Add to default view: Controls propagation.
4.2 Configuring Choice Columns
When creating or editing a Choice column:
- Enter each choice on a separate line.
- Choose display format: Drop-Down Menu, Radio Buttons, or Checkboxes (for multiple selections).
- Optionally allow “Fill-in” choices (users can enter values not in the list).
- Set a default value if appropriate.
Important: When multiple selections (checkboxes) are enabled, you cannot group by that column in views. Filtering still works.
4.3 Configuring Managed Metadata Columns
Managed Metadata columns point to a term set (or a single term) in the Term Store.
- When creating the column, select Managed Metadata as the type.
- Under Term set or term, select the appropriate term set (or create a local term set).
- Choose Display format: Term label only or Full path (shows hierarchy).
- Decide whether to Allow multiple values.
- Optionally allow users to type new values (only if the term set is open).
- Set default value and required status as needed.
Note: Global term sets are managed in the SharePoint admin center (or via Microsoft 365 admin tools). Local term sets are created on a specific site.
4.4 Making Columns Required
To require metadata on new or existing items:
- Edit the column → More options → set Require that this column contains information to Yes.
- Alternatively, configure the requirement at the content type level for more precise control.
4.5 Column Formatting (JSON)
Modern SharePoint supports JSON column formatting to change how values are displayed (color coding, icons, progress bars, conditional styling). From the column header menu, select Column settings → Format this column. This does not change the underlying data—only the visual presentation.
5. Using Content Types for Metadata Consistency
Content types package a set of columns (and optionally a document template and workflow settings) into a reusable definition. They are the recommended way to enforce consistent metadata across multiple libraries.
Typical workflow:
- Create reusable Site Columns for the metadata fields you need.
- Create a Site Content Type (based on Document or Item).
- Add the site columns to the content type and set which are required.
- In the target library, enable content type management (Library settings → Advanced settings → Allow management of content types = Yes).
- Add the content type to the library. Users can then select the content type when creating or uploading items, and the associated metadata columns appear automatically.
For organization-wide consistency, publish content types from a Content Type Hub (configured in the SharePoint admin center).
6. Leveraging Metadata Columns in Views
- Views are the primary way users interact with metadata. A well-designed set of views turns raw columns into useful working surfaces.
6.1 Creating and Editing Views
- In the list or library, select the current view name (e.g., All Items or All Documents) → Create new view, or select Edit current view.
- Choose columns to display and set their order.
- Configure Sort, Filter, Group By, and Totals as needed.
- Save the view. Optionally set it as the default view or make it personal.
6.2 Filtering by Metadata
Filters can be applied in two ways:
- View-level filters: Defined when creating/editing the view (e.g., Status equals “Approved” AND Department equals “Finance”). These are always applied.
- Interactive filters: Users click column headers or use the Filters pane to refine results on the fly.
For large lists (approaching or exceeding 5,000 items), index the columns you frequently filter or sort on (List/Library settings → Indexed columns).
6.3 Grouping by Metadata
Grouping organizes items under expandable headings based on a column value (e.g., group by Department or by Status). You can group by one or two columns. Grouping is not available on multi-value columns.
6.4 Sorting
Views can sort by one or two columns (ascending or descending). Users can also click column headers for temporary sorting. Multi-value columns generally cannot be sorted.
6.5 Practical View Examples
Example views for a document library:
- By Department: Group by Department, sort by Modified descending.
- Pending Review: Filter where Status equals “In Review”, sort by Due Date ascending.
- My Documents: Filter where Owner equals [Me].
- Expiring Soon: Filter where Review Date is less than or equal to [Today]+30.
- All Approved Policies: Filter where Document Type equals “Policy” AND Status equals “Approved”.
7. Best Practices
- Plan before creating: Identify the 4–7 most important metadata attributes users will actually use (Document Type, Department/Function, Status, Owner, Project/Client, Sensitivity or Retention category).
- Prefer site columns and content types: Avoid creating the same column repeatedly in individual libraries.
- Use controlled vocabularies: Choice or Managed Metadata instead of free-text where consistency matters.
- Make key columns required: Especially for Document Type, Status, and Department.
- Index columns used in filters and sorts: Essential for large lists.
- Limit lookup-style columns in any single view: Person, Lookup, and Managed Metadata columns count toward the 12-lookup threshold.
- Avoid deep folder trees: Use one level of folders only if needed; rely on metadata and views for organization.
- Train users: Metadata only works if people fill it in. Provide clear descriptions and short guidance.
- Review periodically: Prune unused columns and update choice/term values as the organization evolves.
8. Quick Reference: Choice vs Managed Metadata
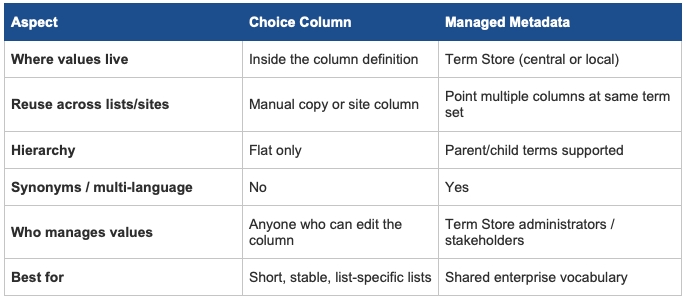
The Filter Pane in modern SharePoint Online lists and libraries becomes significantly more powerful when you use well-designed metadata columns. Here’s why:
What the Filter Pane Is
The Filter Pane is the slide-out panel that appears on the right side of a list or library when you click the filter icon (funnel). It lets users refine the current view interactively—without creating or modifying a permanent view.
How Metadata Columns Amplify Its Power
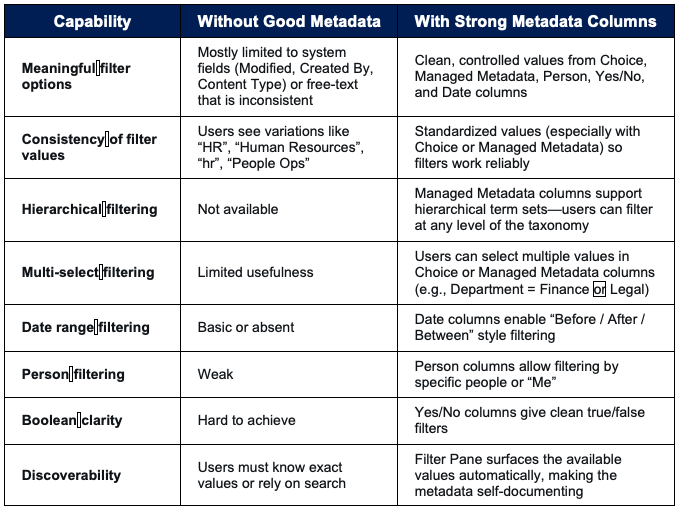
Practical Advantages When Metadata Is Present
- Self-service refinement
Users can answer questions on the fly (“Show me only Approved policies from HR that were modified this year”) without asking an admin to create a new view. - Combination of filters
Multiple metadata columns can be filtered together (AND logic). This is far more powerful than filtering on a single folder or a free-text field. - Works with large libraries
When columns are indexed, the Filter Pane remains responsive even as the library grows past the list view threshold. - Complements permanent views
You can create focused views (e.g., “Pending Review”) and still let users further refine them using the Filter Pane. - Better experience than folders
Instead of forcing users to navigate deep folder trees, metadata + Filter Pane lets them slice the same content in multiple ways (by Department, by Status, by Owner, by Project, etc.).
Best Metadata Types for the Filter Pane
- Choice– Excellent for Status, Category, Priority, Document Type
- Managed Metadata– Best for Department, Function, Topic, or any hierarchical taxonomy
- Person or Group– Owner, Author, Approver
- Date and Time– Due Date, Review Date, Effective Date
- Yes/No– Confidential, Archived, Approved
Bottom Line
- The Filter Pane turns metadata from static labels into an interactive discovery tool. Without good metadata columns, the pane is relatively limited. With thoughtful Choice, Managed Metadata, Person, Date, and Yes/No columns, it becomes one of the most useful everyday features for finding and working with content in SharePoint Online.
Metadata columns vs. folder structures is one of the most important design decisions in SharePoint Online.
Side-by-Side Comparison
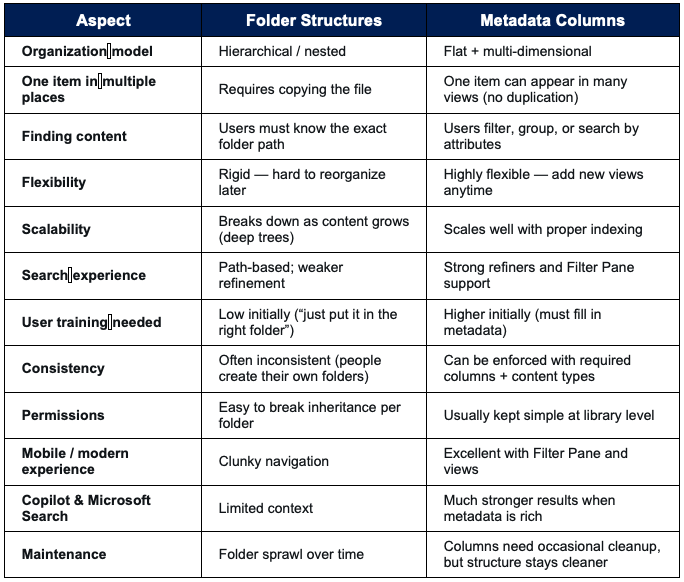
Strengths of Each Approach
Folders are better when:
- You need simple, familiar navigation for non-technical users
- Strict security boundaries are required (unique permissions on specific folders)
- Compliance or records management demands a specific physical hierarchy
- The library is small and stable
Metadata is better when:
- Content needs to be found in multiple ways (by Departmentand Project and Status)
- You want to avoid duplicate files
- You plan to use views, the Filter Pane, search refiners, or Copilot effectively
- The library will grow large
- You want consistent classification across many libraries
The Modern Best Practice (Hybrid Approach)
Most experienced SharePoint practitioners recommend:
- Minimize folders— Use zero or one level of folders at most.
- Lead with metadata— Create 4–7 well-chosen columns (Document Type, Department/Function, Status, Owner, Project/Client, Review Date, etc.).
- Use views + Filter Paneas the primary way users work with content.
- Use folders only for genuine exceptions(e.g., a temporary “Working Files” folder or a folder that truly needs unique permissions).
Real-World Analogy
- Folders= Putting physical documents into nested filing cabinets. To find something, you must know which drawer and which folder it lives in.
- Metadata= Tagging every document with labels (Department, Type, Status, Owner). You can then instantly pull every “Approved HR Policy” or “Everything owned by Sarah that is due this month” without caring where the file is stored.
Bottom Line
Folders feel intuitive at first but become a liability as content grows. Metadata requires more upfront design and user discipline, but it creates a far more powerful, flexible, and future-proof information architecture—especially when combined with modern views and the Filter Pane.