

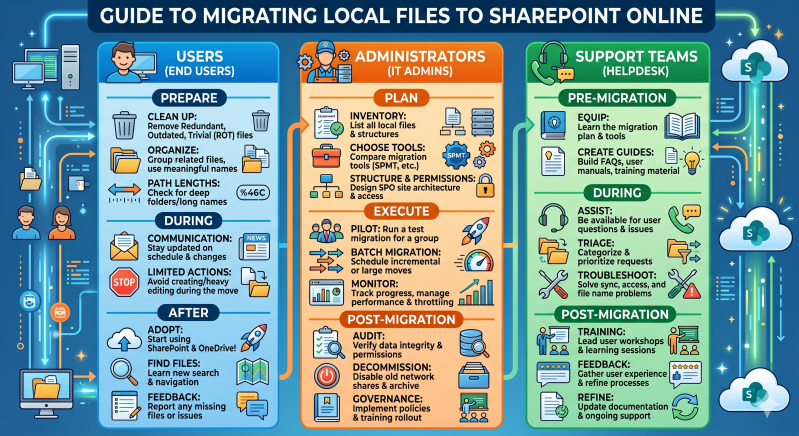
This guide provides SharePoint users, administrators, and support teams with a structured approach to migrating files from on-premises network file shares to SharePoint Online in Microsoft 365. The process emphasizes planning, assessment, execution, and post-migration validation to ensure data integrity, security, and user adoption.
Introduction and Benefits
Migrating from local network file shares to SharePoint Online enables centralized cloud storage, improved collaboration, version history, robust search, and integration with Microsoft Teams and OneDrive. It reduces reliance on on-premises infrastructure while enhancing security and compliance features.
- Key advantages include:
- - Scalable storage with automatic backups.
- - Real-time co-authoring and metadata-driven organization.
- - Simplified permission management via Microsoft Entra ID (formerly Azure AD).
- - Compliance tools such as retention policies and data loss prevention (DLP).
Successful migrations follow phases: planning, assessment and remediation, target preparation, migration, and user onboarding.
Prerequisites and Planning
- Prerequisites:
- Microsoft 365 tenant with appropriate licenses (e.g., SharePoint Online Plan 1/2, Microsoft 365 E3/E5).
- Global Administrator or SharePoint Administrator permissions in the target tenant.
- Source environment: Access to file shares with NTFS/share permissions documented.
- Network: Stable, high-bandwidth connection (consider Azure ExpressRoute for large volumes).
- Tools: Latest SharePoint Migration Tool (SPMT), or third-party options like ShareGate for complex scenarios.
- Microsoft Entra ID synchronization for identity mapping (on-premises AD to cloud identities).
- Planning Steps:
- Inventory and Assessment: Catalog all file shares, volumes, and content. Identify active vs. archival data, duplicates, large files (>15 GB may need special handling), and unsupported elements (e.g., invalid characters in filenames: # % & *).
- Define Target Structure: Map file shares to SharePoint sites, document libraries, or Teams. Avoid deep folder hierarchies; leverage metadata and libraries instead. Limit items per folder/library for performance (recommended: <5,000 items per view/folder where possible).
- Permissions Strategy: Map NTFS and share permissions to SharePoint roles (Read → Read, Write → Contribute, Full Control → Full Control). Note that advanced NTFS permissions and explicit denies simplify or may require manual adjustment. Use Entra ID security groups.
- Phased Approach: Prioritize departments or business units. Pilot with a small, non-critical dataset.
- Governance: Establish naming conventions, retention policies, external sharing rules, and storage quotas.
- Timeline and Resources: Estimate based on data volume (e.g., throughput improves with packages of 100-250 MB containing ≥250 files). Allocate time for testing and user training.
- Risk Assessment: Evaluate data sensitivity, regulatory requirements (e.g., GDPR, HIPAA), and potential downtime.
Recommended Tools
- SharePoint Migration Tool (SPMT): Free Microsoft tool for file shares to SharePoint/OneDrive/Teams. Supports scanning, incremental migration, permissions, and reporting. Install from the official Microsoft download.
- Migration Manager: Available in the SharePoint Admin Center for agent-based, scalable migrations.
- Third-Party Tools: ShareGate, AvePoint, or BitTitan for advanced features like bulk metadata mapping, pre-migration analysis, and detailed reporting (recommended for large or complex environments).
- PowerShell - For automation and custom scripting.
Step-by-Step Migration Process
- Step 1: Install and Configure Tools
- Download and install the latest SPMT.
- Sign in with a SharePoint Administrator account.
- Configure proxy settings if needed and test connectivity.
- Step 2: Scan and Assess Source
- In SPMT, create a scan task for the file share.
- Review reports for issues: file size limits, character restrictions, permission complexities, and estimated migration time.
- Remediate: Clean up invalid files, reduce nesting, and archive old data.
- Step 3: Prepare Target Environment
- Create SharePoint sites and document libraries.
- Configure versioning, metadata columns, content types, and permissions at the site/library level.
- Set up Teams if integrating collaboration spaces.
- Step 4: Create Migration Tasks
- In SPMT: Select file share as source, specify target URL (site/library).
- Map users/groups (e.g., via CSV for bulk).
- Choose settings: Migrate permissions, versions (if applicable), and exclude hidden/system files.
- For bulk: Use CSV or JSON files for multiple tasks.
- Schedule off-peak hours to minimize impact.
- Step 5: Execute Migration
- Run the task and monitor progress via the tool's dashboard.
- Use incremental migrations for ongoing changes.
- For very large datasets, deploy multiple Migration Agents.
- Step 6: Validate Migration
- Compare file counts, sizes, and sample content.
- Verify permissions, metadata, and links.
- Test access and functionality.
Best Practices
- Data Cleanup: Remove ROT (redundant, outdated, trivial) content pre-migration.
- Structure Optimization: Flatten hierarchies; use SharePoint metadata and views for organization.
- Performance: Optimize network: use Azure storage staging if supported. Package data efficiently.
- Permissions: Prefer group-based over individual; minimize broken inheritance.
- Communication: Notify users of timelines, changes, and new access methods.
- Testing: Conduct multiple pilot migrations.
- Security: Enable multi-factor authentication (MFA); apply sensitivity labels and DLP policies post-migration.
- Avoid folder replication, redesign for modern collaboration.
Post-Migration Tasks
- User Onboarding and Training: Provide guidance on SharePoint navigation, syncing with OneDrive, and Teams integration.
- Redirects and Decommissioning: Update mapped drives, shortcuts, and applications. Gradually retire on-premises shares.
- Monitoring: Use SharePoint Admin Center reports and Microsoft 365 usage analytics.
- Optimization: Implement governance policies and conduct regular audits.
- Support: Establish a helpdesk process for post-migration issues.
Troubleshooting Common Issues
- Permission Failures: Verify Entra ID mapping and reapply as needed.
- File Name/Size Errors: Rename files or split large items.
- Throttling: Reduce concurrent tasks or schedule during low usage.
- Incomplete Migrations: Review logs; use incremental runs.
- Performance Issues: Check network bandwidth and agent health.
- Consult Microsoft Learn documentation for detailed error codes.
Security and Compliance Considerations
- Map identities accurately to prevent unauthorized access.
- Apply retention labels and sensitivity labels during or after migration.
- Audit logs in Microsoft Purview for tracking.
- Test disaster recovery and backup configurations.
MIGRATION CHECKLIST APPROACH AND TEMPLATE
This guide provides SharePoint users, administrators, and support teams with a structured approach to migrating files from on-premises network file shares to SharePoint Online in Microsoft 365. The process emphasizes planning, assessment, execution, and post-migration validation to ensure data integrity, security, and user adoption.
1. Introduction and Benefits
Migrating from local network file shares to SharePoint Online enables centralized cloud storage, improved collaboration, version history, robust search, and integration with Microsoft Teams and OneDrive. It reduces reliance on on-premises infrastructure while enhancing security and compliance features.
- Key advantages include:
- Scalable storage with automatic backups.
- Real-time co-authoring and metadata-driven organization.
- Simplified permission management via Microsoft Entra ID.
- Compliance tools such as retention policies and data loss prevention (DLP).
Successful migrations follow phases: planning, assessment and remediation, target preparation, migration, and user onboarding.
2. Prerequisites and Planning
- Prerequisites:
- Microsoft 365 tenant with appropriate licenses.
- Global Administrator or SharePoint Administrator permissions.
- Access to source file shares with documented NTFS/share permissions.
- Stable, high-bandwidth network connection.
- Latest SharePoint Migration Tool (SPMT) or equivalent.
- Planning Steps:
- Inventory and assess content.
- Define target structure and permissions strategy.
- Adopt a phased approach with governance policies.
3. Recommended Tools
- SharePoint Migration Tool (SPMT).
- Migration Manager in the SharePoint Admin Center.
- Third-party tools such as Sharegate for complex migrations.
- PowerShell for automation.
4. Step-by-Step Migration Process
- Refer to the original detailed steps for scan, remediation, target preparation, task creation, execution, and validation.
5. Best Practices
- Perform thorough data cleanup.
- Optimize folder structures using metadata.
- Communicate clearly with users.
- Conduct pilot migrations.
6. Post-Migration Tasks
- Deliver user training.
- Update references and decommission old shares.
- Monitor and optimize the new environment.
7. Troubleshooting Common Issues
- Address permission failures, file naming issues, throttling, and incomplete migrations through logs and incremental runs.
8. Security and Compliance Considerations
Ensure accurate identity mapping, apply sensitivity labels, and maintain audit capabilities.
9. Migration Checklist Template
The following checklist serves as a reusable template. Copy it into a SharePoint list, Excel workbook, or Microsoft Planner for tracking. Each item includes a status field and responsible party for accountability.
Phase 1: Planning
[ ] Define migration objectives, scope, and success criteria
[ ] Identify stakeholders and establish project team roles
[ ] Document business requirements and regulatory obligations (e.g., GDPR, HIPAA)
[ ] Estimate data volume, timelines, and resource requirements
[ ] Develop communication plan for end users
[ ] Obtain necessary approvals and budget
Phase 2: Assessment and Inventory
[ ] Inventory all source file shares and servers
[ ] Scan content using SPMT or third-party tool
[ ] Identify and quantify ROT (redundant, outdated, trivial) data
[ ] Flag large files (>15 GB), invalid characters, and unsupported elements
[ ] Analyze and document current permissions (NTFS and share level)
[ ] Classify data sensitivity and apply preliminary labels
[ ] Create remediation plan for identified issues
Phase 3: Target Environment Preparation
[ ] Create required SharePoint sites and document libraries
[ ] Configure versioning, metadata columns, and content types
[ ] Set up permissions using Entra ID groups (avoid individual assignments where possible)
[ ] Establish retention policies and sensitivity labels
[ ] Configure Teams integration if applicable
[ ] Test target environment access and functionality
Phase 4: Migration Execution
[ ] Install and configure migration tools
[ ] Perform pilot migration with non-critical data
[ ] Execute full migration in prioritized phases
[ ] Enable incremental migration for changed files
[ ] Monitor migration progress and logs in real time
[ ] Address errors and exceptions promptly
[ ] Validate data transfer completeness during migration
Phase 5: Validation and Testing
[ ] Compare file counts, sizes, and sample content between source and target
[ ] Verify permissions, metadata, and version history
[ ] Test search functionality and link integrity
[ ] Confirm user access and collaboration features
[ ] Conduct user acceptance testing (UAT)
[ ] Document and resolve any discrepancies
Phase 6: Post-Migration Activities
[ ] Deliver user training and adoption resources
[ ] Update mapped drives, shortcuts, and application references
[ ] Decommission or archive on-premises file shares
[ ] Configure monitoring and usage reports
[ ] Implement governance policies and conduct initial audit
[ ] Gather feedback and address post-migration issues
[ ] Close project and archive documentation
Checklist Metadata Fields (Recommended):
**Item ID** | **Phase** | **Task** | **Status** (Not Started / In Progress / Completed) | **Responsible** | **Due Date** | **Notes / Issues**
This checklist can be customized based on the scale and complexity of each migration project. For enterprise-scale migrations, consider integrating it with Microsoft Project or Power Automate workflows for automated status updates.
This updated guide, including the checklist template, provides a comprehensive resource for successful SharePoint Online migrations.