Guide to Using the Link Web Part in SharePoint Online Modern Pages
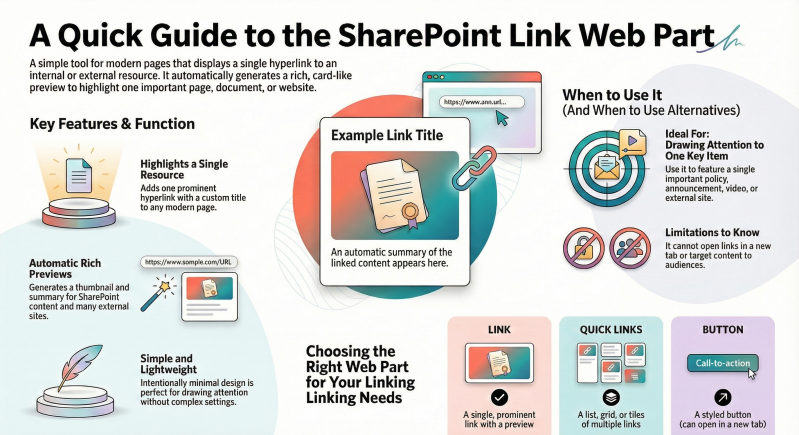
The Link web part is a simple yet powerful modern web part in SharePoint Online that allows you to add a single hyperlink to an internal or external resource, along with an automatic rich preview (card-like display) when available.
It's ideal for highlighting one important page, document, video, image, or external website on your site page.
Key Features
- Displays a clickable link with optional custom text.
- Automatically generates a preview thumbnail and summary for supported content (e.g., SharePoint pages/documents, YouTube videos, images, many public websites).
- Previews work best for internal SharePoint content and popular external sites.
- No preview for some external links (especially in government or certain Office 365 environments).
- Simple and lightweight — perfect for a single prominent link (unlike the Quick Links web part, which is for multiple links).
Note: The Link web part is only available in SharePoint Online modern pages (not in SharePoint Server 2019 or classic pages). If you need multiple links, consider the Quick Links web part instead.
How to Add the Link Web Part
- Navigate to your SharePoint site and open (or create) a modern page.
- Click Edit at the top right of the page to enter edit mode.
- Hover over the area where you want to add the web part (between sections or in a column), then click the + icon to open the web part picker.
- Search for Link (or scroll to find it under the "Text, media, and content" category).
- Click or drag the Link web part onto the page.
How to Configure the Link Web Part
- With the web part selected, paste or type the full URL into the link field (e.g., https://contoso.sharepoint.com/sites/HR/Documents/Policy.docx or https://www.youtube.com/watch?v=example).
- The web part will automatically fetch and display a preview if possible.
- (Optional) Change the displayed link text:
- By default, it uses the title of the linked item.
- Click the pencil icon or edit the text directly to customize it (e.g., "View our Company Policies").
- Remove elements if needed:
- Click the X next to the preview image or link text to hide one or the other.
- Test the link:
- Click Open link (or similar) in the editor to verify it works.
- Additional options (in the edit pencil menu):
- No advanced layout options — the web part is intentionally minimal.
Tips and Best Practices
- Accessibility: Always use meaningful link text (avoid "Click here"). The preview helps screen readers if alt text is available.
- No preview? Some external sites block previews for security reasons. In that case, only the text link appears.
- Open in new tab: Links open in the same tab by default. To force a new tab, you can't configure it directly in the Link web part — use the Button web part instead for that option.
- Mobile responsiveness: The web part scales nicely on phones and tablets.
- Audience targeting: Not available on the Link web part (use Quick Links if you need to show/hide based on Microsoft 365 groups).
- Editing later: Republish the page after changes (or just save if it's a draft).
Common Alternatives
- Quick Links web part — For multiple links with layouts (Compact, Tiles, List, etc.) and audience targeting.
- Button web part — For a styled button with a single link (can open in new tab).
- Hero web part — For large, visual single/multiple links with images.
- Highlighted content web part — Dynamically show links based on queries.
This web part is one of the simplest ways to draw attention to a key resource on your page. For the latest updates, check the official Microsoft documentation: Use the Link web part.