Guide to the Banner Web Part in SharePoint Online
The Banner web part in SharePoint Online is a versatile tool designed to enhance the visual appeal and structure of modern pages and news posts.
Previously known as the "title area," it has been rebranded and upgraded to provide more flexibility. It allows users to create eye-catching headers with text, images, and customizable layouts, and it can be placed anywhere on a page—not just at the top. This makes it ideal for announcements, hero sections, or section dividers.
Whether you're a regular user adding content to a team site or a site owner managing branding and permissions, this guide covers everything you need to know. It's based on the latest features available as of November 2025, including layouts like Author and Fade, and support for multiple banners.
Who Should Use This Guide?
- Users: Anyone with Edit permissions on a SharePoint site who wants to create or enhance pages.
- Site Owners: Those responsible for site permissions, branding consistency, and advanced configurations (e.g., enabling content delivery networks for better image performance).
Prerequisites
Before getting started:
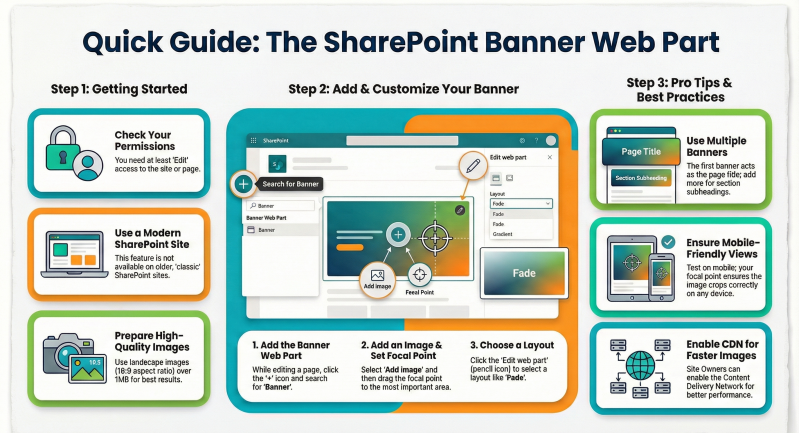
- Ensure you're on a modern SharePoint site (not classic). Check by navigating to your site—if it has a responsive design with web parts, you're good.
- Permissions:
- Users need at least Edit access to the site or page.
- Site owners can grant permissions via Site settings > Site permissions.
- Browser: Use a modern browser like Microsoft Edge, Chrome, or Firefox for the best experience.
- Images: Prepare high-quality images in landscape (16:9 aspect ratio) or 4:3, ideally 1 MB or larger, for optimal scaling.
No additional apps or extensions are required—the Banner web part is built-in.
Adding the Banner Web Part to a Page
The Banner web part is automatically added as the first element when creating a new page, but you can add more anywhere.
Step-by-Step: Creating a New Page with a Banner
- Navigate to your SharePoint site.
- On the homepage, select + New > Page (or from any page, select + New > Page).
- Choose a template (e.g., Blank) and select Create page.
- In the top area (labeled "Add a title"), enter your page title—this creates the initial Banner web part. (Required to save or publish.)
- The page opens in edit mode. Your Banner is now at the top.
Step-by-Step: Adding a Banner to an Existing Page
- Open the page and select Edit (top right).
- Hover below an existing web part (or at the top if starting fresh) until a + icon appears.
- Select the + and search for "Banner" in the web part toolbox.
- Choose the Banner web part and select it to insert.
- If this is the first banner on the page, enter a title in the Banner or the command bar (top) to enable saving.
Tip for Site Owners: For new pages from templates, the Banner appears by default. When copying pages, you'll be prompted to keep or remove the title area/Banner.
Customizing the Banner Web Part
Once added, click the Edit web part pencil icon (or select the Banner and choose Edit properties if the content pane is open on the right). This opens the customization toolbox.
Key Customization Options
Use the table below for a quick overview of properties:
Step-by-Step: Adding an Image
- In the Banner, select Add image (or Change image to replace).
- Choose your source (e.g., upload from computer).
- Crop/resize as needed, then select Done.
- Set focal point: Select Set focal point and drag to the key area (e.g., a person's face)—this ensures it stays visible on crop.
Step-by-Step: Changing Layout
- Select Edit web part.
- In the toolbox, under Layout, pick from the thumbnails (e.g., Fade for a smooth gradient overlay).
- Preview and select Reposition if needed to adjust image/text balance.
Accessibility Note: Banners are WCAG 2.1 compliant. If no visible H1 title, a hidden one uses the page title for screen readers.
Managing Multiple Banners or Removing Them
- Multiple Banners: Add as many as needed via the + icon. The first one in a full-width or three-column section acts as the page title (H1). Others serve as subheadings.
- Remove a Banner: Select it, then click Delete web part in the toolbar. Use Undo immediately if needed, or re-add via the toolbox.
- No Banners: Delete the top one for a clean start—ideal for minimalist pages. Re-add anytime.
- Section Background: Place Banners in sections with color or image backgrounds for themed sections (e.g., full-width for hero banners).
For copied or existing pages: You'll see a prompt to keep/remove the title area during the process.
Best Practices for Users and Site Owners
- Visual Consistency: Use site themes for colors. Match images to branding—site owners can upload approved assets.
- Performance: Enable CDN in site settings (Site owners: Settings > Site information > View all site settings > Search and offline availability > Enable CDN).
- Mobile Optimization: Test on devices; layouts auto-adjust, but focal points help.
- SEO and Navigation: Always use descriptive titles. Banners sync to page metadata.
- For Site Owners:
- Train users on layouts to avoid inconsistencies.
- Monitor via Site usage reports.
- Integrate with Design Ideas (preview feature) for AI-suggested Banner setups.
- Limitations: Not supported in classic sites or emails (though previews work with minor adjustments).
Next Steps
- Experiment on a test page! For advanced customizations, explore SPFx extensions (for developers).