Guide to the People Web Part in SharePoint Online
This guide is designed for SharePoint Online users who create and manage content.
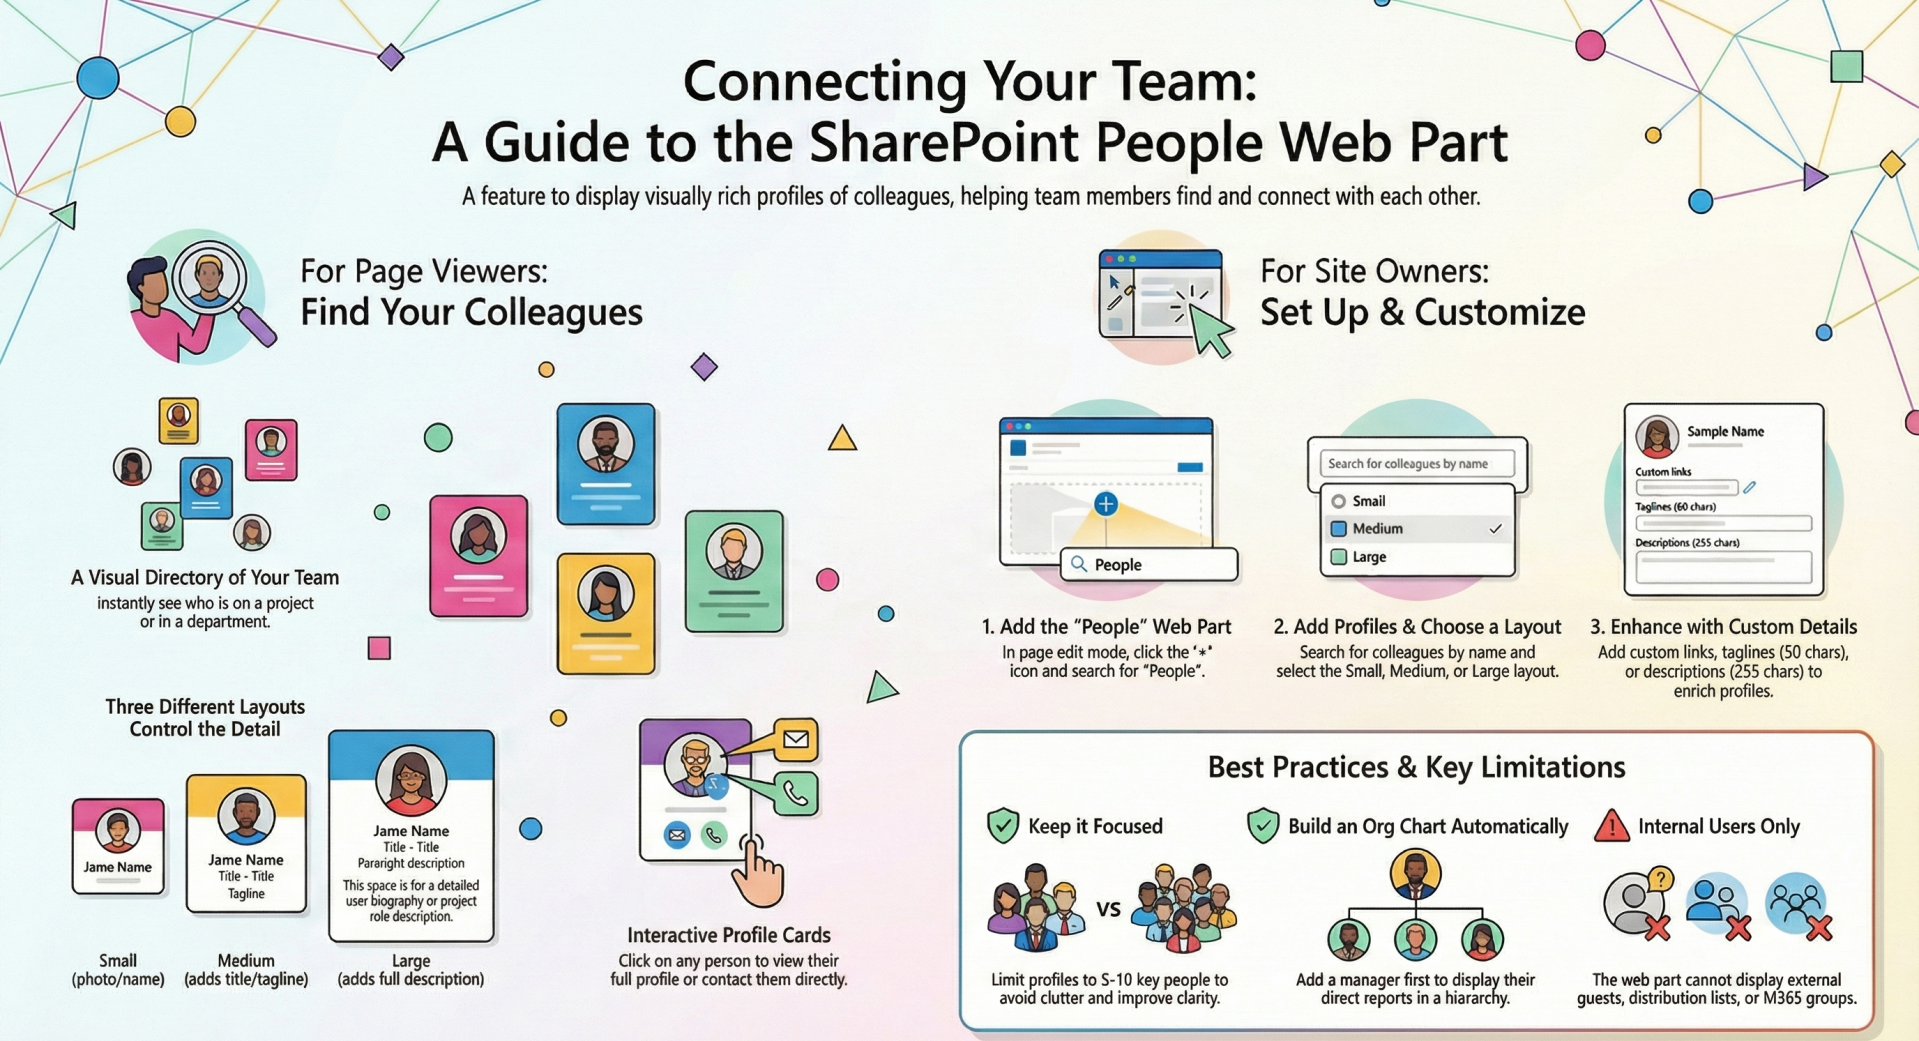
The People web part is a modern SharePoint feature that displays profiles of individuals in your organization, including photos, contact information, job titles, and more. It's ideal for team pages, project sites, or intranets to help users quickly find and connect with colleagues. This web part pulls data from Microsoft 365 user profiles and supports customization to fit your needs.
For Users: Viewing and Interacting with the People Web Part
As a regular user, you'll encounter the People web part on SharePoint modern pages. It helps answer questions like "Who is on my team?" or "How do I contact the project lead?"
What You'll See
- Profile Cards: Each card shows a person's photo (if available), name or email, job title, and optional details like a tagline or description.
- Layout Variations:
- Small (Compact): Basic view with photo and name/email—great for quick scans.
- Medium (Descriptive): Includes photo, name/email, title, a short tagline (up to 50 characters), and possibly a custom link.
- Large: Expanded view for more detailed information, such as full descriptions (up to 255 characters).
- Organization Insights: Some configurations display reporting structures (e.g., who reports to the person) or colleagues they work with, based on Microsoft 365 organizational data.
- Interactivity: Click a profile to view the full Microsoft 365 profile, email, or a custom link (if added).
Tips for Users
- Hover over cards for quick previews.
- If no photo appears, it may take time for profile sync from Microsoft 365.
- Use the web part to network—it's a visual directory for your team.
For Site Owners: Adding and Configuring the People Web Part
Site owners or members with edit permissions can add and customize this web part on modern pages (e.g., communication or team sites). You need at least Edit permissions on the page.
Prerequisites
- Access to a modern SharePoint site.
- Up-to-date Microsoft 365 user profiles for the people you want to feature (ensure photos and details are synced).
- Note: Only internal organization users can be added—no external guests or distribution lists.
Step 1: Adding the Web Part
- Navigate to your SharePoint site and open or create a modern page.
- Click Edit in the top-right corner to enter edit mode.
- In the page content area, click the + icon to open the web part toolbox.
- Search for "People" or scroll to People under the "Social" category.
- Select or drag the People web part onto the page.
- (Optional) Edit the default title ("People profiles") by clicking it and typing a new one, like "Project Team Leads."
Step 2: Adding People Profiles
- In the web part, click Add profile.
- Search by name or email—results pull from your organization's Microsoft 365 directory.
- Select the person and click Add. Repeat for multiple profiles.
- The web part auto-populates details like title and department from their profile.
- It may also show a reporting hierarchy (e.g., direct reports below the selected person).
Step 3: Configuring the Web Part
- Select the web part and click the Edit web part (pencil) icon in the toolbar.
- In the right-hand properties pane:
- Layout: Choose Small, Medium, or Large to control detail level.
- Small: Minimal info.
- Medium: Add tagline (50 chars) and profile link (URL + display text).
- Large: Full description (255 chars) for richer bios.
- Title: Customize or hide it.
- Descriptions/Links: For Medium/Large layouts, add custom text or hyperlinks (e.g., link to a personal site or bio page). These are static and require republishing to update.
- Layout: Choose Small, Medium, or Large to control detail level.
- Reorder profiles: Drag-and-drop cards or use Ctrl + Left/Right Arrow keys.
- Click Republish to save and make changes live.
Step 4: Advanced Options
- Audience Targeting (General Web Part Feature): Prioritize the web part for specific groups.
- In the web part properties pane, toggle Audience targeting to On.
- Assign Microsoft Entra ID (Azure AD) groups, Microsoft 365 groups, or dynamic groups.
- Users outside targeted groups see the web part but with lower priority; non-targeted content shows for all.
- Enable site-wide in Site settings > Audience targeting settings for libraries if needed.
- Best for department-specific team pages.
- Web Part Management:
- Duplicate: Copy the web part for similar pages.
- Move: Relocate to another section.
- Delete: Remove via the toolbar.
Best Practices for Site Owners
- Choose the Right Layout: Use Small for high-level overviews (e.g., executive teams) and Medium/Large for detailed intros (e.g., project contributors with bios).
- Keep It Concise: Limit to 5–10 profiles to avoid clutter; prioritize key roles.
- Enhance Engagement: Add custom links to OneDrive folders, Teams channels, or external bios. Use taglines for quick value props, like "Expert in AI Integration."
- Leverage Hierarchy: Add managers first to auto-show reports—perfect for org charts.
- Accessibility: Ensure alt text for images and clear titles; test on mobile.
- Maintenance: Regularly review for outdated profiles (e.g., job changes). Republish after edits.
- Combine with Other Web Parts: Pair with Quick Links for resources or News for announcements.
- Security: Only add verified internal users; audience targeting adds personalization without exposing sensitive info.
Limitations
- No External Support: Cannot add guests or non-organization users.
- Static After Publish: Descriptions/links don't auto-update; edit and republish as needed.
- Character Limits: 50 chars for taglines, 255 for descriptions.
- No Dynamic Groups/Lists: Won't pull from distribution lists or M365 groups automatically.
- Sync Delays: Profile photos/titles may lag if not updated in Microsoft 365.
- Audience Targeting: Not all web parts fully support it; test for People specifically.
Troubleshooting Common Issues
- No Results When Searching? Check user profiles in Microsoft 365 admin center.
- Profiles Not Showing Hierarchy? Ensure org data is synced in Microsoft Entra ID.
- Changes Not Visible? Republish the page and clear browser cache.
- Permission Errors? Verify your role (Owner/Editor) in site settings.
For the latest updates, refer to Microsoft Learn or SharePoint admin center. If you manage multiple sites, consider training sessions for consistent use.