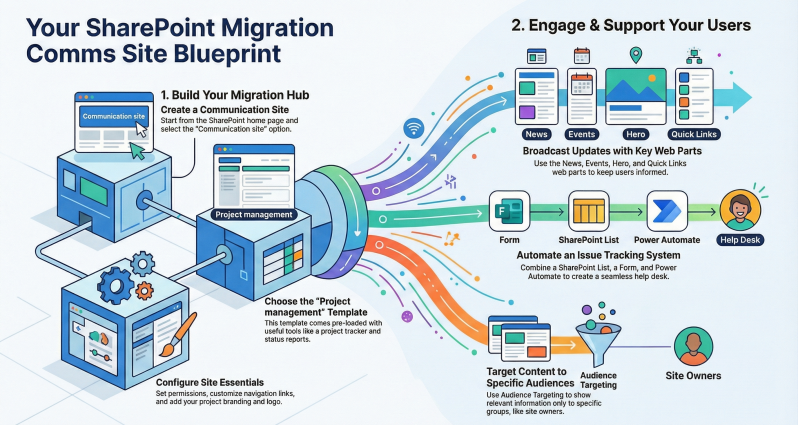
Create a Communication Site For Your Migration Projects
A SharePoint communication site is ideal for broadcasting project information to a broad audience, such as end users and site owners, without requiring collaboration features like those in team sites.
It supports responsive design for viewing on any device and allows a small group (e.g., project admins) to manage content while the majority consumes it. No Microsoft 365 group is created with a communication site, which keeps permissions focused on read access for viewers.
Step-by-Step Creation Process
- Sign in to Microsoft 365: Access your Microsoft 365 account and launch SharePoint from the app launcher (waffle icon) in the top-left corner. If SharePoint isn't visible, select "More apps" or search for it. Ensure you have site owner permissions; if self-service site creation is disabled, contact your Microsoft 365 admin to enable it via the SharePoint admin center.
- Navigate to Create a Site: On the SharePoint start page, click + Create site in the top-right corner. If associating the site with a hub site (for shared navigation across related sites), first go to the hub site and click Create site there—the new site will inherit the association automatically.
- Select Site Type and Template: Choose Communication site. Then, select a template:
- Topic: Best for text-heavy content like project status, news, and schedules (includes Hero, News, Events, Quick links, and People web parts by default).
- Showcase: Ideal for visual milestones or training previews (includes Hero and Image gallery web parts).
- Blank: For full customization from scratch.
- Project management: Pre-populated with tools like a project tracker list, issues tracker, and status report template—perfect for your migration project.
- Configure Site Details:
- Enter a Site name (e.g., "SharePoint Migration Project Hub"). This auto-generates the site URL (editable; use underscores or hyphens only).
- Add a Site description (e.g., "Central hub for migration updates, schedules, training, and support tickets").
- Select Privacy settings: Choose "Public - anyone in the organization can access this site" for broad visibility, or "Private" if limiting to specific groups.
- If enabled by your admin, select a Site classification (e.g., for sensitivity or lifecycle).
- Choose a Language (cannot be changed later; defaults to your organization's language).
- Click Create site. The site provisions in seconds and appears in your followed sites.
- Customize Basic Settings:
- Permissions: Go to Settings > Site permissions. Add owners (full control, e.g., project leads) and members (edit access for content updates). For visitors (read-only), use "Everyone except external users" or an existing Microsoft 365 group. Break inheritance if needed for granular control, but keep it simple for broad access.
- Navigation: Edit the top navigation bar (horizontal or vertical) via Edit in the header. Add links to pages like "Project Status," "Schedule," "Training," and "Submit Ticket." If using a hub, enable mega menus for sub-navigation.
- Branding: Under Settings > Change the look, upload a logo (PNG preferred, 192x64 pixels for rectangular), select a theme, and customize the header (compact, extended, or standard).
- Site Pages Library: All pages (e.g., homepage) are stored here. Create new pages via New > Page for dedicated sections like milestones or support.
- Share the Site: Click Share site in the top-right. Generate a link for organization-wide access or specific users. Pin the site to the SharePoint start page or Microsoft Teams for easy discovery. Notify users via email or news posts.
- Maintenance Plan: Schedule regular reviews (e.g., weekly) to update content, check links/web parts, and monitor usage analytics (under Settings > Site usage). Post news frequently and use audience targeting for relevant updates.
The site is now live. For your migration project, focus the homepage on key sections (e.g., Hero web part for quick status overview) and build out pages for deeper content.
SharePoint Features and Web Parts for Staying Updated and Getting Help
Communication sites shine for one-way broadcasting, making it easy to keep users informed via dynamic, visual content. Use modern pages (created via New > Page) as building blocks—add sections with layouts (e.g., one-third columns for quick links) and insert web parts as "building blocks" for content. Edit pages by clicking Edit in the top-right; save drafts or republish changes.
Key features for your scenario:
- News Posts: Built-in for announcements (e.g., migration waves). Posts appear in the News web part and can be targeted to audiences (e.g., site owners only).
- Audience Targeting: Filter content visibility by Microsoft 365 groups (e.g., show training only to affected users).
- Integration with Power Automate: Automate notifications (e.g., email alerts for new milestones) or workflows (e.g., ticket approvals).
- Microsoft Lists Integration: Create custom lists for schedules/milestones; embed as web parts for interactive views.
- Search and Analytics: Built-in search across the site; usage reports track views/engagement.
- Mobile Responsiveness: All content adapts to devices—no extra setup needed.
- Permissions for Help Features: Use read-only views for public status; edit access for ticket submission.
Implementing Issue Ticket Logging
To enable end users/site owners to log tickets without full list edit access:
- Create a Ticket List: On your site, go to Site contents > New > List. Use the "Issue tracker" template (includes Title, Description, Priority, Status columns). Add custom columns (e.g., Site URL, Attachments). Enable attachments and versioning for tracking.
- Build the Intake Form:
- From the list, select Integrate > Power Apps > Customize forms to create a custom form (or use the default new item form).
- Simplify for users: Hide internal fields (e.g., Status, Assigned To) using Power Apps rules (e.g., make read-only or conditional visibility).
- Publish the form; generate a shareable link via Share > Copy link (set to "Anyone with the link can submit").
- Embed the Form:
- On a "Support" page, add the Microsoft Forms web part (or embed the Power Apps form via iframe if customized).
- For seamless integration: Use Power Automate to flow responses to the list (see below).
- Automate Ticket Workflow with Power Automate:
- Go to powerautomate.microsoft.com > Create > Automated cloud flow.
- Trigger: "When a new response is submitted" (Microsoft Forms connector; select your form).
- Action: "Get response details" (Forms).
- Action: "Create item" (SharePoint; map form fields to list columns, e.g., Description to Issue Description).
- Optional: Add conditions (e.g., high-priority emails) or approvals; attach files via "Add attachment."
- For notifications: Add "Send an email" (Outlook) to alert support team.
- Save and test: Submit a form response; verify it creates a list item.
- User Views and Security:
- Create views (e.g., "My Tickets" filtered by Created By) for users to track status without full access.
- Set item-level permissions: Under List settings > Advanced > Item-level permissions, allow "Create items" but restrict "Read items that were not created by the user" to hide others' tickets.
- For admins: Full edit access to update status/resolution.
This setup ensures users submit tickets easily (via form embed or link) while admins manage in the list. Responses auto-populate, reducing manual entry. For advanced reporting, connect the list to Power BI (embed via web part) for dashboards on ticket volume or resolution times.
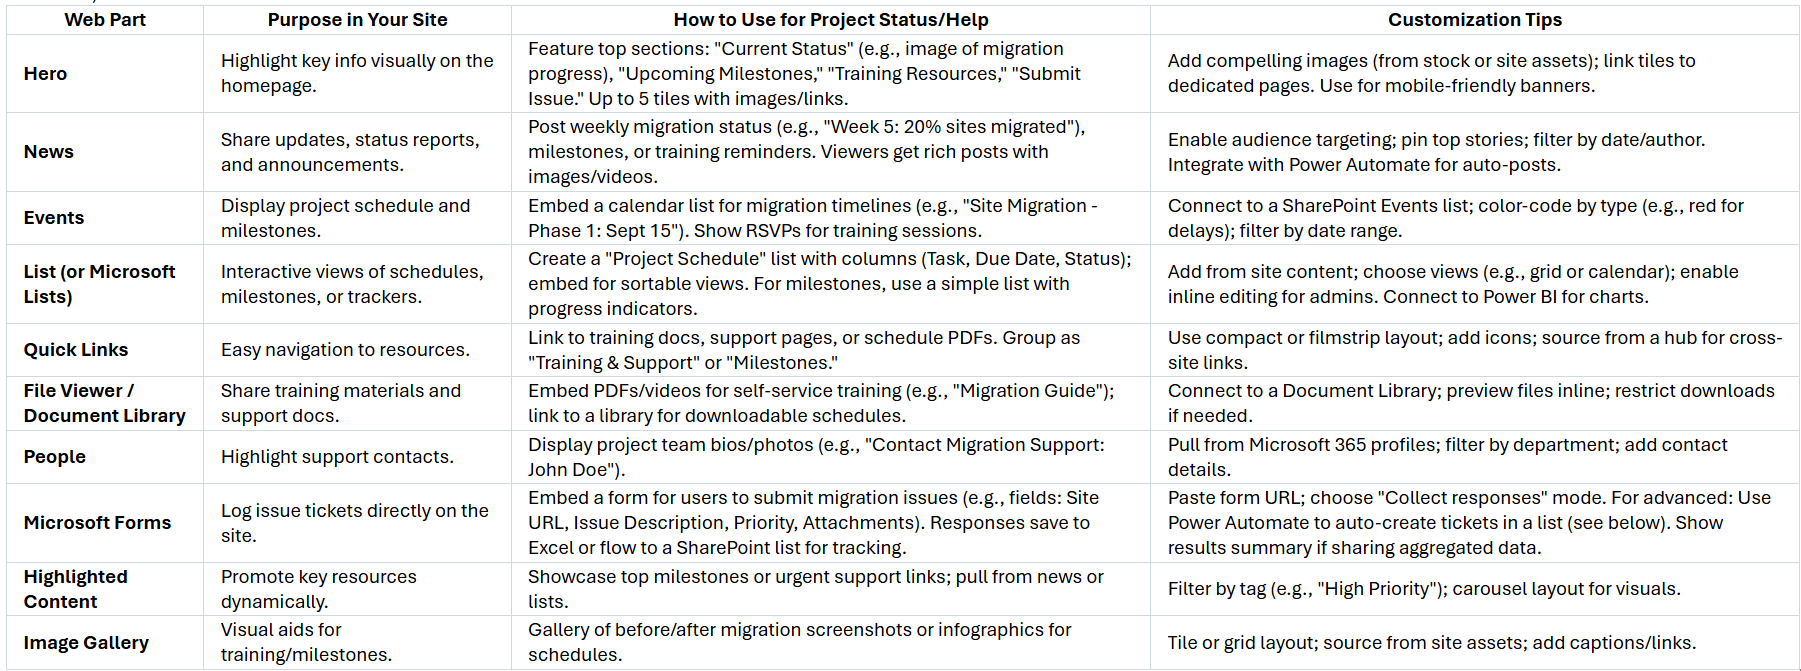
Recommended Web Parts for Project Updates and Help
Use these to build intuitive pages. Add them via the + icon while editing a page, searching by name. Customize layouts (e.g., tile vs. carousel) and connect web parts for dynamic filtering (e.g., filter schedule by milestone).