

SharePoint Mentor Curated Articles
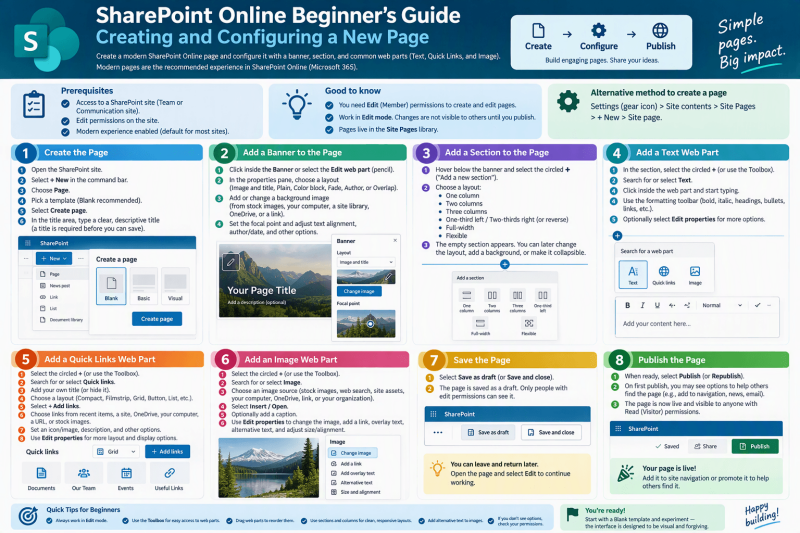
SharePoint Online Beginner’s Guide: Creating and Configuring a New Page
This guide walks you through creating a modern SharePoint Online page and configuring it with a banner, section, and common web parts (Text, Quick Links, and Image). It assumes you have at least Edit (Member) permissions on the site. Modern pages are the recommended experience in SharePoint Online (Microsoft 365).
Prerequisites
- Access to a SharePoint site (Team or Communication site).
- Edit permissions on the site.
- Modern experience enabled (default for most sites).
1. Create the Page
- Open the SharePoint site where you want the page.
- On the home page (or any page), select + New in the command bar at the top.
- Select Page.
- Choose a template (recommended for beginners: Blank). Other templates (Basic, Visual, etc.) come with pre-built sections and web parts you can modify.
- Select Create page.
- In the title area at the top (it says “Add a title”), type a clear, descriptive page title.
Note: A title is required before you can save or publish the page. This also becomes the page name and part of the URL.
The page opens in edit mode.
Alternative method: Go to Settings (gear icon) > Site contents > Site Pages library → + New → Site page.
2. Add a Banner to the Page
Modern pages use a Banner web part for the title area (this replaced the older fixed title region).
- The page already shows a Banner area at the top with your title.
- Click inside the Banner or select the Edit web part (pencil) icon on it.
- In the properties pane on the right:
- Choose a Layout (e.g., Image and title, Plain, Color block, Fade, Author, or Overlap).
- To add a background image: Select Add image / Change image → choose from Stock images, your computer, a site library, OneDrive, or a link.
- Set the focal point by dragging the circle so the most important part of the image stays visible when the banner is cropped on different screens.
- Adjust text alignment, show/hide author or published date if available, and other options.
- Click away or close the pane when finished.
You can later remove the top Banner or add extra Banner web parts elsewhere if needed.
3. Add a Section to the Page
Sections control the layout (columns) of content below the banner.
- While in edit mode, hover your mouse below the Banner (or below any existing content).
- A horizontal line with a circled + appears. Select the + (tooltip: “Add a new section”).
- Choose a layout:
- One column
- Two columns
- Three columns
- One-third left / Two-thirds right (or reverse)
- Full-width (spans the entire page edge-to-edge; useful for banners or heroes)
- Flexible (more free-form grid layout in newer experiences)
- The empty section appears. You can later change the section layout, add a background color/image, or make it collapsible via the section properties (select the section and use the toolbar or properties pane).
4. Add a Text Web Part to the Section
- Inside the new section, hover and select the circled + (or use the Toolbox icon on the right side of the page).
- Search for or select Text.
- Click inside the Text web part and start typing.
- Use the formatting toolbar that appears (bold, italic, headings, bullets, numbered lists, links, tables, highlight, etc.).
- Optionally select Edit properties on the web part for additional options.
5. Add a Quick Links Web Part to the Section
- In the same section (or another column if multi-column), select the circled + again (or use the Toolbox).
- Search for or select Quick links.
- Overwrite the default title with your own (or leave/hide it).
- Select a layout (Compact, Filmstrip, Grid, Button, List, Tiles, etc.) using the layout options above the web part.
- Select + Add links.
- Choose links from recent items, a site, OneDrive, your computer, a URL, or stock images.
- For each link you can set an icon/image, description (depending on layout), and other properties via the pane on the right.
- Select Edit properties on the web part for more layout and display options (e.g., show images, descriptions).
6. Add an Image Web Part to the Section
- In the section, select the circled + (or Toolbox).
- Search for or select Image.
- Choose an image source:
- Stock images (Microsoft-provided)
- Web search (Bing Creative Commons – review licensing)
- From a site / Site Assets
- Your computer (upload)
- OneDrive
- Link
- Your organization (if an organization assets library is configured)
- Select Insert / Open.
- Optionally add a caption below the image.
- Select the image and use Edit properties (or the toolbar) to:
- Change the image
- Add a link
- Add overlay text
- Set alternative text (important for accessibility)
- Adjust size/alignment
7. Save the Page
- While still in edit mode, select Save as draft (or Save and close if co-authoring is enabled in your organization) in the command bar at the top.
- The page is saved as a draft. Only people with edit permissions can see it. Visitors cannot view unpublished pages.
You can leave and return later: open the page and select Edit to continue working.
8. Publish the Page
- When the page is ready, select Publish (or Republish if it was previously published) in the command bar.
- On first publish you may see options to help others find the page (e.g., add to site navigation, news, email, etc.). Choose as needed or skip.
- The page is now live and visible to anyone with Read (Visitor) permissions on the site.
Tips after publishing
- To edit again later: Open the page → Edit → make changes → Republish.
- To add the page to navigation: Use the Promote option or edit the site’s left/top navigation.
- Pages live in the Site Pages library (Settings → Site contents → Site Pages).
Quick Tips for Beginners
- Always work in Edit mode. Changes are not visible to others until you publish.
- Use the Toolbox (right side) for easy access to all web parts.
- Drag web parts to reorder them within or between sections.
- Keep pages focused—use sections and columns for clean, responsive layouts that work on mobile.
- Add alternative text to images for accessibility.
- If you don’t see certain options, check your permissions or ask your SharePoint admin.
You’re now ready to create and configure modern SharePoint Online pages! Start with a Blank template and experiment—the interface is designed to be visual and forgiving.