

Deep Dive into the Quick Links Web Part in SharePoint Online
The Quick Links web part is a versatile component that enables users to create customizable collections of links on modern pages. It allows for "pinning" important items such as documents, pages, sites, or external resources for quick access, enhancing navigation and productivity. This web part supports various layouts to suit different visual and functional needs, and it includes options for personalization.
Some features may roll out gradually via Microsoft's Targeted Release program, so availability can vary by tenant or user. This document provides a comprehensive overview based on official Microsoft documentation and best practices.
Adding the Quick Links Web Part
To incorporate the Quick Links web part into a SharePoint page:
- Navigate to the modern page where you want to add the web part and ensure it's in edit mode by clicking Edit in the top-right corner.
- Hover over an existing section or click the + icon to add a new web part.
- In the web part toolbox that appears, search for "Quick links" or scroll to find it under the list of available web parts.
- Select Quick links to add it to the page.
- Customize the default title by clicking on it and typing a new one (e.g., "Team Resources").
- Choose a layout from the options displayed above the web part (detailed in the next section).
- Click the pencil icon or Edit web part in the toolbar to access the property pane for additional settings.
Prerequisites:
You need edit permissions on the page, and the site must use modern pages (classic pages do not support this web part natively). No special setup is required beyond having SharePoint Online access.
Layout Options
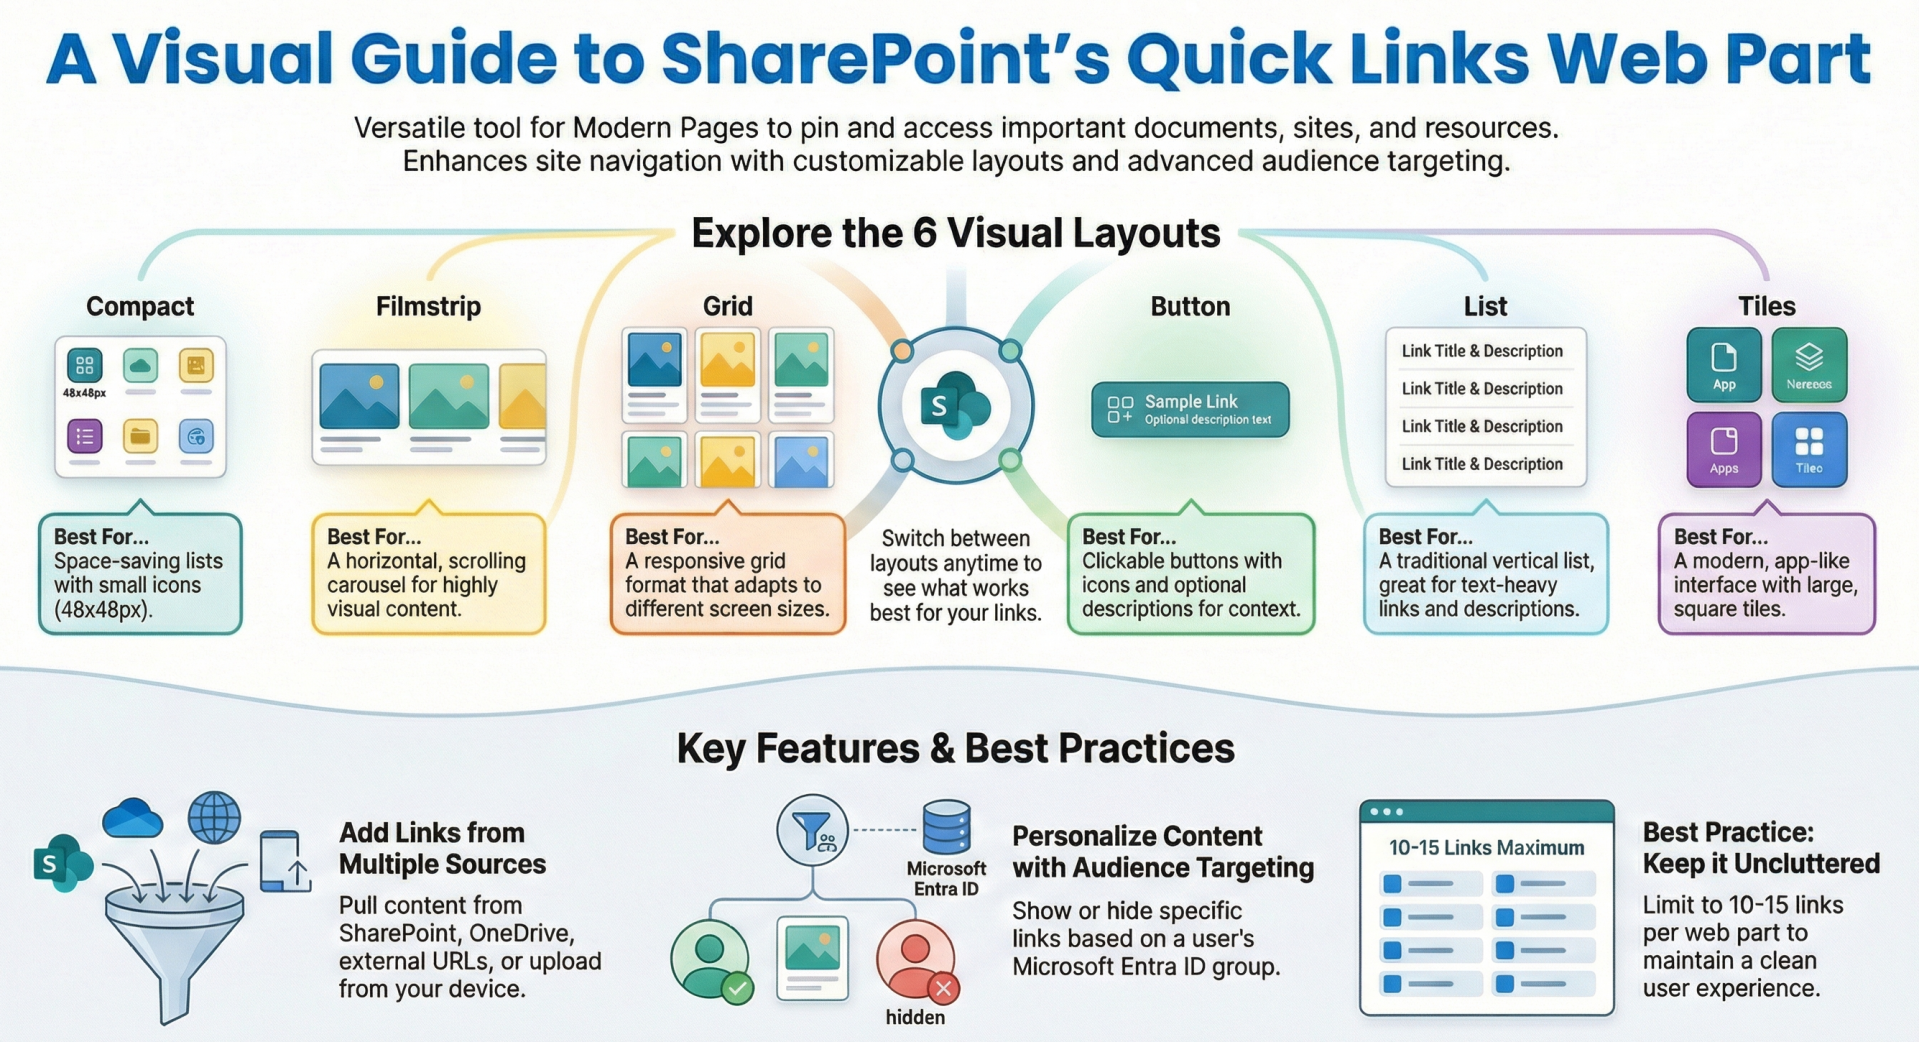
The Quick Links web part offers six distinct layouts; each designed for different display preferences and content densities. Layouts can be selected from the toolbar above the web part during editing. Here's a breakdown:
- Compact: Ideal for space-saving displays. Shows links as a list with small icons (48x48 pixels). Option to show or hide images via the property pane.
- Filmstrip: A carousel-style layout for horizontal scrolling. Displays larger images (width 212-286 pixels, 9:16 aspect ratio). Best for visual content like images or thumbnails, reordering links is not supported in this layout.
- Grid: Arranges links in a responsive grid format, suitable for multiple items. Supports images and can adapt to different screen sizes.
- Button: Presents links as clickable buttons, often with icons or images. Allows showing descriptions below the button text for added context.
- List: A vertical list view, similar to a traditional menu. Supports descriptions and is great for text-heavy links.
- Tiles: Displays links as square or rectangular tiles with images or icons. Provides a modern, app-like interface and supports larger visuals.
Each layout has unique customization options accessible via Edit web part > Layout options. For example, Compact and Tiles emphasize icons, while Button and List allow toggling descriptions. Switching layouts preserves existing links but may require adjusting images or text for optimal fit.
Limitations:
- Layout availability is limited to SharePoint Online (not Server editions). Some layouts may not support all features, like reordering in Filmstrip.
Link Management
- Managing links in the Quick Links web part is straightforward, with tools for adding, editing, removing, and organizing items.
Adding Links
- With the web part in edit mode, click + Add links or the + icon within the web part.
- In the dialog that opens, select from the following sources:
- Recent: Pulls from recently accessed files or pages in your SharePoint or OneDrive.
- Stock images: Microsoft-provided royalty-free images.
- OneDrive: Files from your personal OneDrive.
- Site: Browse and select items from the current site or other connected sites.
- Upload: Directly upload files or images from your device.
- From a link: Paste a URL to an external site, internal page, or resource.
- Your organization: If an admin has set up an organization assets library, select approved images or assets here.
- For image-based links, you can also search the web via Bing (results under Creative Commons; verify licensing).
- After selecting, click Insert to add the link.
Editing and Removing Links
- Hover over a link in edit mode and click the pencil icon to open its properties.
- Edit details like the display name, URL, description (if enabled in layout), image/icon, or alt text for accessibility.
- To remove, hover and click the trash icon.
- Reorder links by dragging and dropping using the move handle (six dots) or keyboard shortcuts (Ctrl + Left/Right arrows). Not available in Filmstrip.
Best practice: Use descriptive names and alt text for better accessibility. For performance, enable a Content Delivery Network (CDN) in your tenant settings if you're an admin, especially for image-heavy links.
Customization Settings
Beyond layouts, the property pane (accessed via Edit web part) offers extensive customization:
- Title and Description: Override the web part title; some layouts allow a subtitle or intro text.
- Image and Icon Options: Toggle "Show image in layout" for Compact/Grid/Tiles. Choose icons from a library or upload custom ones. For web-searched images, ensure compliance with licenses.
- Description Toggle: Available in Button and List layouts; shows additional text under each link.
- Size and Spacing: Implicitly handled by layouts, but responsive design ensures mobile friendliness.
- Theme Integration: Automatically matches the site's theme, but custom CSS isn't directly supported in the web part (use site-level customizations if needed).
Accessibility features include alt text for images, keyboard navigation for reordering, and semantic HTML for screen readers. No explicit sorting options beyond manual reordering; links appear in the order added or arranged.
Advanced Features
Audience Targeting
This feature lets you show or hide specific links based on Microsoft Entra ID (formerly Azure AD) groups, making content relevant to different audiences (e.g., HR links only for HR staff).
- In the web part property pane, go to Filter and toggle Enable audience targeting to On.
- For individual links: Hover, edit, and under Audiences to target, search/add groups (up to 10 per link).
- Publish the page; targeted links appear only to group members. In edit mode, an icon indicates targeted items.
Note: Delays may occur for new groups (up to 24 hours). This requires the feature to be enabled at the site level.
- Pinning Items
- While not a separate "pinning" tool, adding links effectively pins them to the page. No dynamic pinning from other sources.Other Advanced Options
- Integration with Organization Assets:
- Admins can designate libraries for reusable images, improving consistency.
- Performance Optimizations:
- Use CDN for faster loading of images from SharePoint libraries.
- No built-in analytics or versioning for the web part itself, but page views can be tracked via SharePoint analytics.
Limitations:
- Audience targeting doesn't support individual users, only groups.
- No automated sorting (e.g., alphabetical) or filtering beyond targeting.
Best Practices and Additional Limitations:
- Best Practices:
- Use Compact or List for text-focused links; Tiles or Filmstrip for visual appeal.
- Limit to 10-15 links per web part to avoid clutter; use multiple web parts if needed.
- Combine with other web parts (e.g., Hero for prominent links) for a dynamic page.
- Test on mobile devices for responsiveness.
- Leverage audience targeting for personalized experiences, like department-specific resources.
- Always verify external link URLs and image licenses to comply with policies.
- Limitations:
- No support for custom code or scripts within the web part.
- Reordering unavailable in Filmstrip; no auto-sorting.
- Features may vary by release channel; opt into Targeted Release for early access.
- Not available in SharePoint Server (on premises); limited to Online.
- Potential delays in audience targeting propagation.
This web part is a core tool for improving site navigation, and regular updates from Microsoft may introduce new options—check the official docs for the latest.