The Image web part is one of the most commonly used web parts in modern SharePoint pages.
It allows you to add single images with rich customization options, including cropping, resizing, linking, captions, text overlays, and automatic alternative text for accessibility. This guide is for both end users (contributors) and site owners, current as of late 2025.When to Use the Image Web Part
- Single hero/banner images
- Inline illustrations in text
- Clickable images that link to documents, pages, or external sites
- Images with text overlay (e.g., call-to-action banners)
- Do not use for multiple images → use the Image Gallery web part instead.
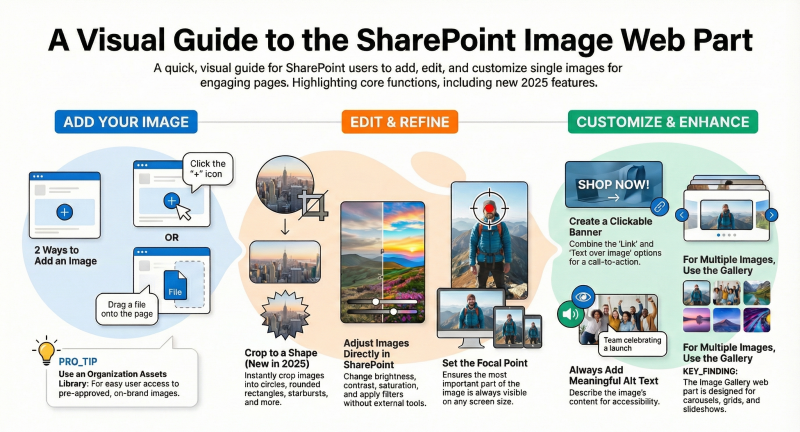
How to Add the Image Web Part
- Edit the page (click Edit at top right).
- Hover over a section and click the + button (or use the toolbox on the right).
- Search for or scroll to Image and add it.
- You can also simply drag an image file from your computer directly onto the page → SharePoint will automatically insert an Image web part for you (new in recent updates).
Tip for Site Owners: Enable an Organization Assets library (SharePoint admin center) so users can easily pick from approved brand images.
Permission Note: If you pick an image from a library that viewers don’t have access to, SharePoint will prompt you to copy it to the Site Assets library so everyone can see it.
Editing the Image (2025 Features Included)
Once the image is inserted, click it in edit mode to reveal the image toolbar.
Crop Options
- Aspect ratio crop – Choose 16:9 (widescreen), 3:2, 4:3, or 1:1. You can rotate the crop box 90° if needed.
- Free-ratio crop – Drag the corners/sides manually.
- Crop to shape (new in 2025) – Circle, rounded rectangle, pebble, starburst, etc. Great for profile photos or spotlight images.
- Advanced editing (2025 rollout) – Adjust brightness, contrast, saturation, warmth, filters, and enhancements directly in the web part (no need for external tools).
Resize
- Drag the corner handles, or
- Use the Resize button on the toolbar to scale proportionally.
Replace Image
- Double-click the image → paste (Ctrl+V) a new one, or
- Drag a new image from your computer directly onto the existing image.
Zoom / Focal Point
When cropping or in properties, you can zoom and pan to set the focal point so the most important part of the image is always visible on different screen sizes.
Customization Options (Edit Web Part Pencil Icon)
Alternative text
- Always add meaningful alt text (e.g., “Team celebrating project launch” not “image001.jpg”).
- Text that appears below the image. Can be styled with the text toolbar.
- Use for photo credits or short descriptions.
Link
- Make the entire image clickable (internal page, document, external URL).
- Great for banners (“Learn more →”).
Text over image
- Add overlay title + body text (choose light/dark text, position, background opacity).
- Perfect for promotional banners.
Image layout
- Default (inline) or “Text overlay” mode.
- Best Image Sizes & Scaling (Avoid Blurry or Stretched Images)
- SharePoint automatically scales images responsively, but upload the right size to start with:
Column Layout
Pro Tip: Use 16:9 for most modern layouts (Hero, banners, Carousel). Use at least 1–2 MB files for sharp quality.
Accessibility Best Practices
- Always review the auto-generated alt text.
- If the image is decorative only → set alt text to empty (“”).
- Use captions or surrounding text to provide context if needed.
- Test with Microsoft Accessibility Checker (Review tab → Check Accessibility).
Advanced Tips for Site Owners & Power Users
- Performance – Enable the Microsoft 365 CDN (SharePoint admin center) so images load faster globally.
- Brand control – Set up Organization Asset Libraries for images and icons so users only pick approved assets.
- Reusable images – Store frequently used images in Site Assets or a dedicated picture library and link to them.
- Clickable banners – Combine Image web part + Text overlay + Link = professional-looking call-to-action sections.
- Multiple images? → Use the Image Gallery web part instead (supports Carousel, Brick, Grid, Tiles layouts and automatic slideshows.
Quick Reference Cheat Sheet
Add image
- Click + → Image or drag file onto page
Crop to circle/pebble
- Select image → Crop → Crop to shape (2025 feature)
Make image clickable
- Edit web part → Link → paste URL
Add “Learn more” banner text
- Edit web part → Text over image
Change image without losing crop/settings
- Double-click image → paste or drag new one
Set focal point
That’s it! With the image editing enhancements (crop to shape, filters, direct enhancements), the Image web part is now powerful enough that most users never need to leave SharePoint to edit photos. Use it generously – great images make pages significantly more engaging.