Creating Copilot Agents and Adding the Agent Link Web Part to SharePoint Pages
Introduction
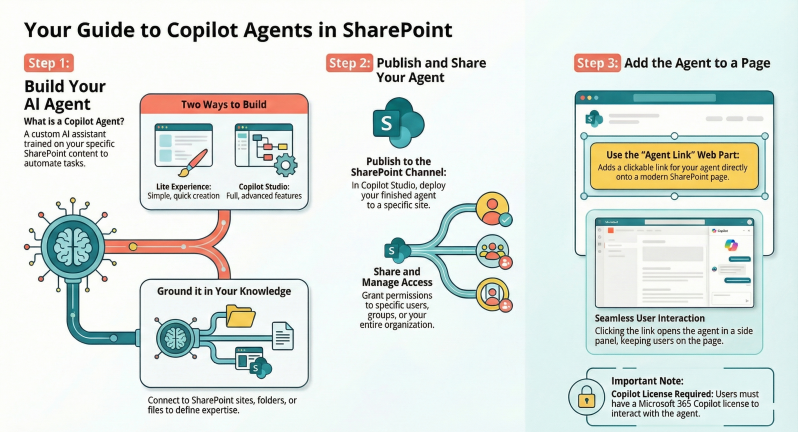
Microsoft Copilot Agents are AI-powered assistants built using Microsoft Copilot Studio or directly within Microsoft 365 Copilot and SharePoint. These agents extend the capabilities of Microsoft 365 Copilot by integrating custom knowledge sources, such as SharePoint sites, files, or external data, to automate tasks, provide insights, and enhance collaboration.
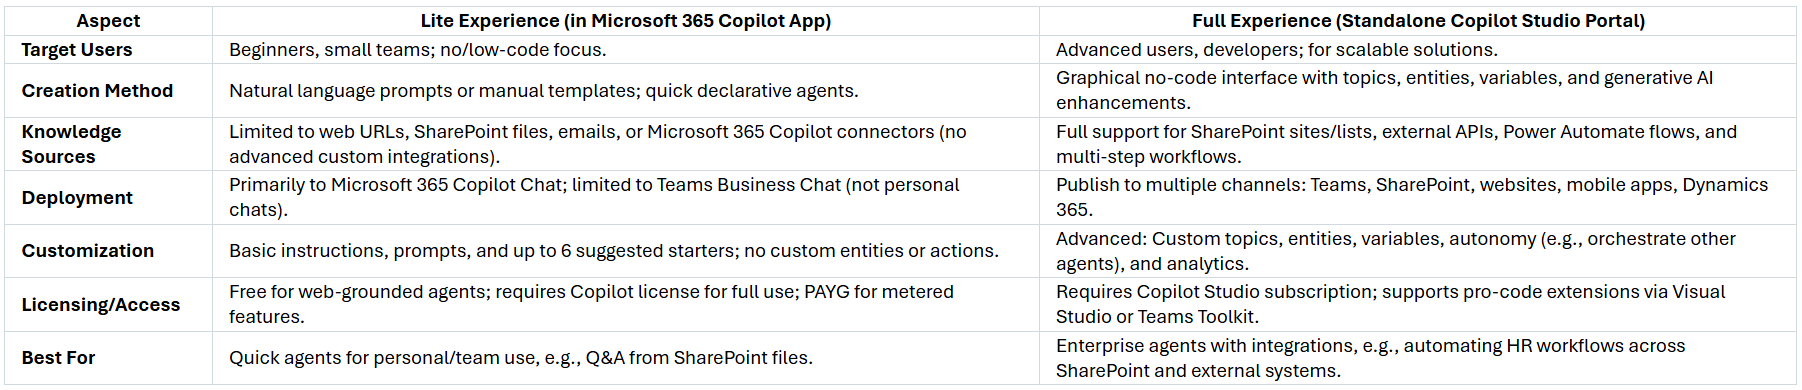
Copilot Studio offers two experiences for building agents: a lite experience integrated into the Microsoft 365 Copilot app for quick, no-code creation using natural language, and a full experience in the standalone Copilot Studio portal for more advanced, scalable agents with custom integrations. Agents created in Copilot Studio can be published to channels like Microsoft Teams, SharePoint, or Microsoft 365 Copilot Chat.
Integrating agents with SharePoint allows users to access contextual AI help directly on site pages. The Agent Link web part is a SharePoint feature that embeds clickable links to these agents on pages, launching them in a sidecar pane for seamless interaction without leaving the page. This web part appears under the AI category in the SharePoint web part toolbox and requires a Microsoft 365 Copilot license for users to interact with linked agents.
Q&A guide based on official Microsoft documentation and best practices covering prerequisites, step-by-step creation of agents (focusing on SharePoint-grounded agents), publishing, and integrating via the Agent Link web part.
Q1: What are the prerequisites for creating Copilot Agents and using the Agent Link web part in SharePoint?
A1: To create and use Copilot Agents, as well as add the Agent Link web part to SharePoint pages, the following prerequisites apply:
- Licensing:
- A Microsoft 365 Copilot license (E3/E5 or equivalent) for the user creating or interacting with agents. Non-licensed users in organizations with Pay-As-You-Go (PAYG) enabled for SharePoint agents can use them on a metered basis.
- For Copilot Studio, access to a Power Platform environment. The lite experience is available in the Microsoft 365 Copilot app; the full experience requires Copilot Studio licensing (included in Microsoft 365 Copilot or via PAYG).
- SharePoint Advanced Management (SAM) is recommended for admins to manage Restricted Content Discoverability (RCD) policies, which is included with Copilot for Microsoft 365.
- Permissions:
- Site owner or editor permissions on the SharePoint site for adding web parts.
- Write access to the SharePoint site for publishing agents.
- For knowledge sources like SharePoint, users must have read access to the files/sites included.
- Tools and Access:
- Sign in to Copilot Studio at https://copilotstudio.microsoft.com/ or the Microsoft 365 Copilot app.
- SharePoint Online modern sites (the Agent Link web part is not supported in classic sites, mobile apps, or emails).
- Supported browsers: Microsoft Edge or Google Chrome for full functionality.
- Limitations:
- Agents respect data loss prevention (DLP) policies and user permissions; inaccessible content is excluded from responses.
- SharePoint knowledge sources are limited to specific file types (e.g., .docx, .pdf) and modern pages; classic .aspx pages are not supported.
- Initial agent creation may take 1-10 minutes for backend setup.
Without these, users may see access-denied messages when interacting with agents.
Q2: How do I create a Copilot Agent using the lite experience in Microsoft 365 Copilot?
A2: The lite experience allows quick agent creation via natural language. Follow these steps:
- Access the Tool:
- Open the Microsoft 365 Copilot app (web or Teams) and navigate to the right rail.
- Select Create agents (or in Teams: Agents > Create Agent).
- Build the Agent:
- Choose Create with Copilot for natural language or select a template (e.g., "Q&A Bot" for SharePoint queries).
- Describe the agent in plain language, e.g., "Create an agent that answers questions about our HR policies from SharePoint files."
- Copilot Studio will generate a draft based on your description.
- Configure Details:
- Name and Description: Provide a name (e.g., "HR Policy Assistant") and description (up to 8,000 characters) for conversation style/tone, e.g., "Respond like a helpful HR advisor."
- Knowledge Sources: Add SharePoint sites, files, or folders. Select Add knowledge > SharePoint > Enter URL (e.g., a team site). Include associated hub sites if needed. Limit to accessible content.
- Instructions: Customize prompts, e.g., "Use only internal SharePoint data; cite sources."
- Suggested Prompts: Auto-generated up to 6 starters, e.g., "What is our vacation policy?"
- Test the Agent:
- Use the built-in test pane with starter prompts or type queries.
- Refresh to test updates; ensure responses ground in knowledge sources.
- Save and Create:
- Changes auto-save. Select Create (top right) to finalize. This takes 1-2 minutes after the first agent.
The agent is now available in My agents. For SharePoint integration, proceed to publishing.
Q3: How do I create a more advanced Copilot Agent using the full Copilot Studio experience?
A3: For complex agents, use the full portal:
- Sign In:
- Go to https://copilotstudio.microsoft.com/ and sign in with your Microsoft 365 account.
- Start Creation:
- On the home page, select Create > New agent > Conversational agent.
- Or use natural language: Describe the agent, e.g., "Build an agent for sales queries using SharePoint product docs."
- Configure Basics:
- Name and Icon: Enter a name and optional icon.
- Description and Instructions: Define purpose and tone (up to 8,000 characters).
- Knowledge Sources: Select Knowledge tab > Add knowledge > SharePoint. Enter site URL or list; upload files/folders if needed. Supported: Modern pages, docs (.docx, .pdf), but not classic .aspx.
- Enhance with Topics and Features:
- Topics: Create conversation paths (e.g., trigger phrases like "sales pitch"). Add entities (custom data extractors) and variables (to store info).
- Generative AI: Enable for dynamic responses; add Power Automate flows for actions (e.g., update SharePoint lists).
- Authentication: Set to "Authenticate with Microsoft" for SharePoint access in Teams/SharePoint.
- Test and Iterate:
- Use the Test your agent pane. Refresh after changes.
- Add suggested prompts for Teams/M365 use.
- Publish:
- Select Publish > Channels > SharePoint to deploy (detailed in Q6).
This process supports autonomy, e.g., agents that plan and escalate tasks.
Q4: How do I add SharePoint as a knowledge source to a Copilot Agent?
A4: SharePoint integration grounds agents in site-specific data:
- In Copilot Studio (lite or full), open your agent and go to the Knowledge tab.
- Select Add knowledge > SharePoint.
- Enter the SharePoint site URL (e.g., https://contoso.sharepoint.com/sites/HR) or select a list.
- Choose files/folders: For individual items, upload or link; for sites, include associated hubs automatically.
- Set authentication: Default is "Microsoft" for secure access in M365 apps.
- Test: Query the agent with SharePoint-related questions; it will cite sources.
Limits: Up to 4,000 files per source; responses exclude inaccessible content. Agent transcripts omit SharePoint-grounded answers for privacy.
Q5: How do I publish a Copilot Agent to SharePoint?
A5: Publishing makes the agent available on a SharePoint site:
- In Copilot Studio, open the agent and select Publish (or Create/Update in lite).
- Go to Channels tab > Search for and select SharePoint.
- Configure the channel:
- Enter the SharePoint site URL.
- Set authentication (Microsoft default).
- Ensure DLP policies allow it.
- Deploy: Select Save and Deploy. Users with site access see a Copilot icon on the site.
- Test: Visit the site; click the Copilot icon to interact. Responses respect user permissions.
For SharePoint-specific agents (built directly in SharePoint), select Create an agent from site content (e.g., files) and publish via the agent list. Billing: Uses Copilot Studio capacity or PAYG.
Q6: What is the Agent Link web part, and why use it for SharePoint integration?
A6: The Agent Link web part is a SharePoint feature (GA in August 2025) that adds a clickable link to a Copilot Agent on a modern page. Clicking opens the agent in a sidecar pane for contextual help, improving discoverability without navigation.
Benefits:
- Enhances UX by surfacing agents where needed (e.g., HR site linking to a policy agent).
- Supports custom or ready-made SharePoint agents.
- Configurable: Choose size (small/medium/large), show title, and link to any published agent (site-specific or cross-site).
- License-aware: Non-licensed users see access-denied messages.
Not supported in mobile/email. Use for home pages or relevant sections to boost collaboration.
Q7: How do I add the Agent Link web part to a SharePoint page?
A7: Follow these steps to embed the web part:
- Navigate to the Page:
- Go to your SharePoint modern site and open/edit the target page (e.g., home page). If not in edit mode, select Edit (top right).
- Add the Web Part:
- Hover above/below an existing web part to see the + icon.
- Click + > Search for "Agent link" (under AI category).
- Select Agent link from the list.
- Configure the Web Part:
- Link to Agent: Select the published agent from your site or another (via search or URL).
- Display Options: Choose size (small/medium/large), enable "Show title," and add custom link text (e.g., "Ask HR Bot").
- Preview: Test the link; it opens the agent in the side pane.
- Save and Publish:
- Select Republish or Save as draft.
- Users can now click the link to chat with the agent contextually.
Plan placement on high-traffic pages. Ensure the agent is published and users have access.
Q8: How do I share a Copilot Agent and manage access in SharePoint?
A8: Sharing ensures controlled access:
- In Copilot Studio/SharePoint agent list: Select the agent > Share (or ellipsis > Share).
- Options:
- Specific users/groups: Add emails or Microsoft 365 groups (avoid distribution lists to prevent failures).
- Organization-wide: For broad access.
- Copy Link: Generate a shareable link for Microsoft 365 app store or direct use.
- For SharePoint: Reshare after updates to knowledge sources.
- Management:
- Admins: Use Integrated Apps in Microsoft 365 admin center to approve/delete agents.
- Delete: In agent list > Ellipsis > Delete.
- RCD Policy: Admins enable via SharePoint admin center to restrict site content in agents.
Shared agents respect permissions; inaccessible sources are ignored. Download ZIP for manual Teams deployment if needed.
Q9: What are common troubleshooting tips and best practices for Copilot Agents in SharePoint?
Troubleshooting:
- Access Issues: Verify Copilot license/PAYG; check permissions on knowledge sources.
- No Responses: Ensure agent is published; test in Copilot pane. Refresh after updates (may take minutes).
- Knowledge Gaps: Confirm SharePoint files are modern/accessible; avoid classic pages.
- Errors in Web Part: Confirm GA rollout (post-August 2025); use desktop browser.
- Billing: Monitor PAYG in Microsoft 365 admin center.
Best Practices:
- Start simple: Use lite for prototypes; scale to full for actions.
- Ground in SharePoint: Limit sources to relevant sites for accuracy.
- Customize: Add instructions for tone/compliance; use markdown.
- Security: Enable RCD for sensitive sites; review DLP policies.
- Test Thoroughly: Use varied queries; provide feedback via thumbs up/down.
- Integrate: Combine with Power Automate for workflows; share via links/Teams.
- Monitor: Use Copilot Studio analytics for usage insights.
For advanced scenarios, explore Copilot Studio workshops or Microsoft Learn paths.
Conclusion
- Copilot Agents empower SharePoint users with tailored AI assistance, streamlining information access and automation. By creating agents in Copilot Studio and embedding them via the Agent Link web part, organizations can enhance productivity while maintaining security.
Copilot Studio provides two building experiences tailored to different needs: Choose lite for rapid prototyping and full for complex, organization-wide agents. No direct upgrade path exists; recreate in full if needed.