

Overview of Copilot Agents in SharePoint
Copilot agents in SharePoint are AI-powered assistants that help users interact with content in SharePoint sites and document libraries. They can summarize documents, answer questions, and support workflows based on the knowledge sources you provide, such as specific files, folders, or entire sites.
Every SharePoint site and document library comes with a built-in agent sourced from the site's content, but you can create custom ones tailored to your needs.
Creating a custom Copilot agent in a SharePoint document library is a no-code process that leverages the content in that library. Below is a step-by-step guide based on the official process.
Prerequisites
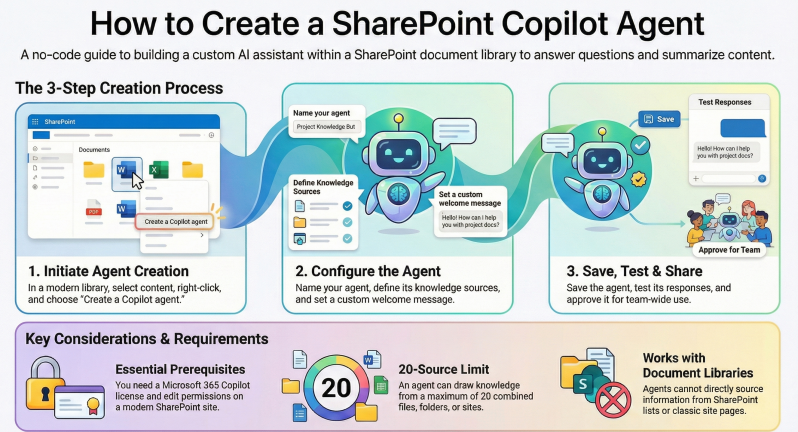
- A Microsoft 365 Copilot license or pay-as-you-go service enabled for SharePoint agents.
- Permissions to create and edit content in the SharePoint site or document library.
- Access to a modern SharePoint site (agents are not supported in classic sites).
- Limit: Up to 20 source items (e.g., sites, libraries, folders, files) per agent.
Step-by-Step Process to Create a Copilot Agent in a SharePoint Document Library
- Navigate to the Document Library:
- Open your SharePoint site in a web browser.
- Go to the specific document library where you want to create the agent (e.g., via Site Contents > [Library Name]).
- Ensure you're in the modern view of the library.
- Select the Content for the Agent's Knowledge Source:
- In the document library, select the files, folders, or the entire library that you want the agent to use as its knowledge base.
- To select multiple items, hold Ctrl (or Cmd on Mac) and click them.
- For the whole library, you can proceed without selecting specifics initially, as the agent can default to the current library.
- Note: Agents primarily source from document-type libraries (e.g., Word, PDF files). Site pages are not directly includable at this stage, but you can add links to other sites later.
- In the document library, select the files, folders, or the entire library that you want the agent to use as its knowledge base.
- Initiate Agent Creation:
- With the content selected, right-click on one of the selected items (or click the ellipsis "..." menu next to an item).
- From the context menu, select Create a Copilot agent (or Create agent in some interfaces).
- Alternatively, if no content is selected, you can access this from the library's homepage or the "New" menu in the command bar, then choose to base it on the current library.
- Configure the Agent's Identity:
- In the agent creation pane that opens, provide basic details:
- Name: Give the agent a descriptive name (e.g., "Sales Pitch Assistant").
- Icon: Optionally choose or upload an icon for visual identification.
- Description: Add a brief overview of the agent's purpose (e.g., "Summarizes product docs from the library").
- This sets the agent's "identity" and helps users understand its role.
- In the agent creation pane that opens, provide basic details:
- Define the Knowledge Sources (Sources Tab):
- By default, the agent sources from the selected content or the entire current site/library.
- Customize as needed:
- Add or remove specific document libraries, folders, or files from the current site.
- To include content from other SharePoint sites, enter the site URL or select from a dialog (up to 20 items total).
- Use the dialog to browse and add: Click "Add content" to open a selection pane for libraries, folders, or files.
- Ensure all sources are within your permissions; the agent can only access content the user has rights to.
- Tip: Start narrow (e.g., one folder) to test, then expand.
- Set the Agent's Behavior (Behavior Tab):
- Customize how the agent interacts:
- Welcome Message: Define a greeting that appears when users open the agent (e.g., "Hi! I'm here to help with our project docs. Ask me to summarize files or compare versions.").
- Starter Prompts: Add 3 example prompts to guide users (e.g., "Summarize the latest report," "What are the key differences between File A and File B?").
- Instructions (System Prompt): Provide overarching guidelines for the agent's responses (e.g., "Focus on sales-related content and emphasize benefits. Always cite sources.").
- These elements make the agent more user-friendly and aligned with your workflows.
- Advanced customizations (e.g., connecting to external data or complex flows) can be done later in Copilot Studio, but basic creation doesn't require it.
- Customize how the agent interacts:
- Save and Test the Agent:
- Click Save or Create to finalize. The agent file (e.g., "MyAgent.agent") is automatically saved:
- If created from the site's homepage, it's stored in Site Contents > Site Assets > Copilots.
- If from a document library, it's saved directly in the current library folder.
- Test immediately: Click the agent file to open it, or access via the Copilot button (top-right corner of the site/library). Ask questions based on your sources to verify it works.
- Interact in the Copilot pane: The agent will respond using the library's content (e.g., "Summarize this document").
- Click Save or Create to finalize. The agent file (e.g., "MyAgent.agent") is automatically saved:
- Share and Approve the Agent (Optional but Recommended):
- To make it available to others:
- In the Copilot pane, click the arrow next to the agent's name, then select Share to generate a link (users need Copilot licenses to interact).
- As a site owner or admin, approve it: Click the three dots in the Copilot window and select Set as approved. Approved agents appear in the site's agent picker for all visitors.
- You can also add the agent to Microsoft Teams channels for broader use.
- Note: Agents are site-specific by default and don't automatically appear in Microsoft 365 Copilot app lists yet.
- To make it available to others:
Additional Tips and Limitations
- Editing an Existing Agent: Open the .agent file in the library, then use the Sources and Behavior tabs to modify.
- Advanced Features: For more (e.g., integrating with non-SharePoint data), export to Copilot Studio via the "Advanced customization" option (available in some previews).
- Limitations: No support for SharePoint lists, classic pages, or exceeding 20 sources. Large files (e.g., >300MB PDFs) may need indexing via Azure AI Search for full coverage. Agents respect permissions, so responses are secure.
- Backend Note: Each agent creates a .agent file in Site Assets > Copilots, which admins can manage for governance.
- If issues arise, check your license status or consult Microsoft Support.
This process streamlines collaboration by turning your document library into an interactive knowledge base. For the most up-to-date details, refer to Microsoft's official documentation.