Guide to Creating a SharePoint Online Modern Page and Adding Sections and Web Parts
SharePoint Online modern pages are responsive mobile-friendly pages that allow you to create engaging content using sections, columns, and web parts. Web parts are the building blocks of these pages, enabling you to add text, images, videos, documents, dynamic content, and more.
Modern pages are available on both Team sites and Communication sites, with some features (like full-width sections) exclusive to Communication sites.
Step 1: Creating a New Modern Page
- Navigate to the SharePoint site where you want to add the page.
- Go to the home page of the site (or any existing page).
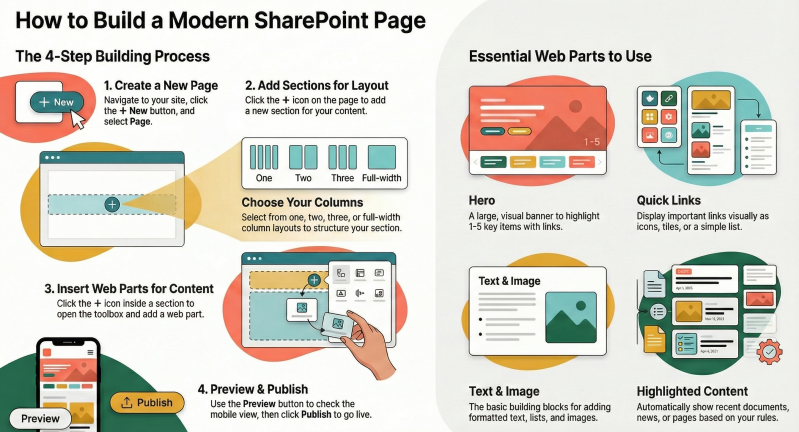
- Click + New in the top navigation bar, then select Page.
- Alternatively, from the Site Pages library: Click New > Page.
- You can also select Copy of this page from an existing page to duplicate its structure and content.
- Choose a template (if prompted) or start with a blank page.
- Enter a Page title in the title area.
- The page will open in edit mode, ready for customization.
The new page includes a default title area (which acts as a Hero-like banner) and an initial section for content.
Step 2: Editing the Page and Title Area
- If not already in edit mode, click Edit in the top-right corner.
- Customize the title area:
- Add or change the background image.
- Choose from various layouts (e.g., plain, overlay, color block).
- Add text overlay or author information.
- Show/hide the published date or author.
- When finished editing, click Save as draft (to save changes without publishing) or Publish (to make the page live).
Step 3: Adding and Customizing Sections - Sections organize content vertically on the page and can contain columns for side-by-side layouts.
- In edit mode, hover below an existing section (or at the bottom of the page) to reveal the + Add a new section button.
- Click the + button and select a section layout:
- One column: Full-width content.
- Two columns: Side-by-side (equal or varied widths).
- Three columns: Three equal side-by-side areas.
- Full-width column (Communication sites only): Spans the entire page width, ideal for banners or highlights.
- Vertical section: A sidebar-like column on the right for navigation or quick info.
- Flexible: Allows free placement of web parts (advanced layout).
- Additional section options:
- Add a background color or image for emphasis.
- Make the section collapsible (for hiding/showing content).
- Duplicate or move the section.
- Change column layout after adding (via the section toolbar).
Sections stack vertically, and you can add as many as needed for a structured, scannable page.
Step 4: Adding Web Parts to Sections - Web parts are added within sections or columns.
- In edit mode, hover in a section/column to reveal the + button.
- Click + to open the web part toolbox.
- Search for a web part or browse categories.
- Select a web part to add it (or drag it into place).
- Once added:
- Click the pencil icon (Edit) on the web part to configure properties (e.g., source, layout, title).
- Move the web part by dragging it.
- Duplicate, delete, or reposition it.
- Common ways to add:
- Use the curated quick-add list.
- Click See all web parts for the full list.
Common Web Parts and Their Uses:
- Text: Add formatted text, headings, bullet lists, or tables.
- Image: Upload or link to images; supports galleries.
- Hero: Highlight 1–5 items with large images, titles, and calls-to-action (great for banners).
- Quick Links: Display links as icons, tiles, or lists for navigation.
- Document Library: Embed files or folders from a library.
- List: Show items from a SharePoint list (e.g., tasks, events).
- Highlighted Content: Dynamically display content based on filters (e.g., recent documents).
- News: Create or aggregate news posts.
- Embed: Add external content (e.g., YouTube videos, forms).
- Button: Add clickable calls-to-action with custom labels and links.
- Spacer: Add vertical space for better layout breathing room.
- Events: Display upcoming events with details and maps.
- People: Show profiles or organizational info.
- Microsoft Forms: Embed surveys or polls.
- Power BI: Embed reports and dashboards.
- Viva Engage (formerly Yammer): Add conversations or feeds.
- File and Media: Preview and play files/videos directly.
Many web parts support dynamic filtering, audience targeting, and responsive design.
Step 5: Finalizing and Publishing the Page
- Preview the page on different devices (via the preview button).
- Click Republish to update a live page or Publish for a new one.
- Optionally, promote the page as news or set it as the site homepage.
Best Practices
- Use sections and columns for organized, readable layouts.
- Limit web parts per section to avoid clutter.
- Leverage images and Hero/Quick Links for visual appeal.
- Test responsiveness on mobile.
- Use audience targeting for personalized content.
- Save drafts frequently during long edits.
This process allows you to build professional, dynamic pages in SharePoint Online without coding. For the latest updates, refer to Microsoft documentation as features evolve.