

SharePoint Content Approval: Governance and Publishing Control
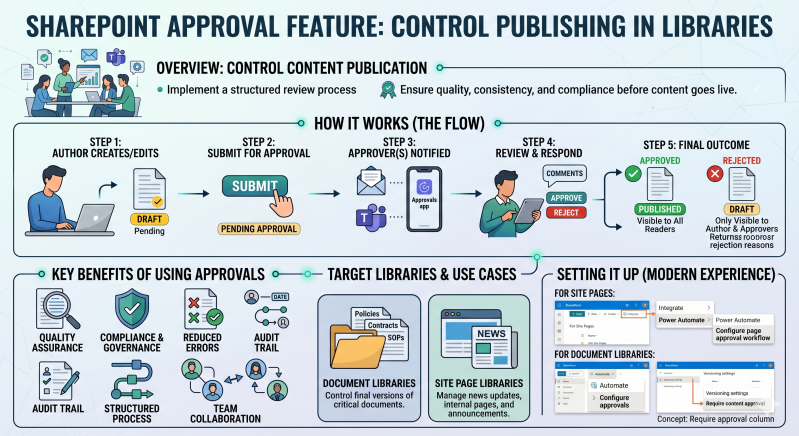
The SharePoint Approval feature is a critical governance tool that allows organizations to control the visibility and publication of documents and site pages. By implementing an approval process, you ensure that content is vetted for quality, accuracy, and compliance before it becomes visible to the broader audience of your SharePoint site.
1. The Value of Content Approval
Implementing approvals provides several strategic advantages for document management and internal communications:
- Quality Assurance: Ensures that all published materials meet organizational standards and have been reviewed by subject matter experts.
- Enhanced Compliance: Creates a clear audit trail of who approved a document and when, which is vital for regulated industries.
- Version Separation: Prevents users with "Read" access from seeing draft content. They only see the last-approved "Major" version, while authors work on "Minor" drafts.
- Reduced Errors: Minimizes the risk of premature publication of sensitive information or incomplete site pages.
Operational Efficiency: Automates the notification process via Microsoft Teams and email, reducing the need for manual follow-up.
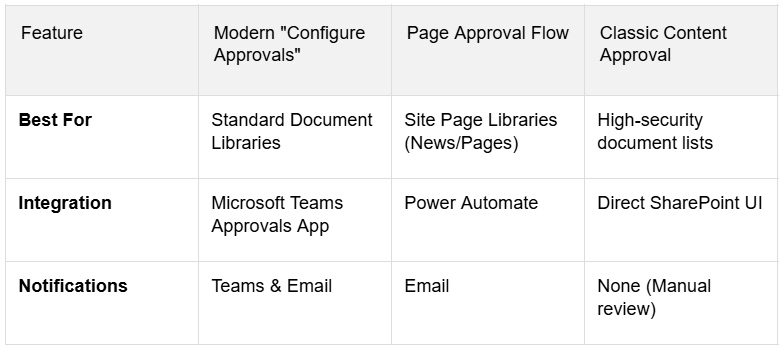
2. Comparison of Approval Models
SharePoint offers several ways to handle approvals depending on the library type and complexity of the workflow.
3. Setting Up Approvals
For Document Libraries (Modern Method)
- Navigate to your SharePoint Document Library.
- In the command bar, select Automate > Configure Approvals.
- Toggle the Enable Approvals switch to "On".
- (Optional) Define default approvers and whether a response is required from all or just one.
- Click Apply. SharePoint will automatically add an "Approval status" column.
For Site Page Libraries
- Navigate to the Site Pages library.
- Select Automate > Power Automate > Configure page approval flow.
- Follow the side-panel prompts to name the flow and assign approvers.
- Click Create. Note: Once enabled, the "Publish" button on pages is replaced by "Submit for Approval".
4. The Approval Lifecycle
Once enabled, the typical process follows these steps:
- Step 1: Drafting: The author creates or edits a file/page. The status is "Draft".
- Step 2: Submission: The author clicks "Submit for Approval" (or "Not Submitted" pill).
- Step 3: Notification: Approvers receive a notification in Teams or Email with a link to review the item.
- Step 4: Review: The approver examines the content and provides feedback/comments.
- Step 5: Decision:
- Approve: The item status changes to "Approved," and it is published (visible to everyone).
- Reject: The item returns to "Draft" or "Rejected" status. Only the author and approvers can see it until resubmitted.