Understanding SharePoint Hub Sites: Purpose, Benefits, and Usage
What are SharePoint Hub Sites?
SharePoint Hub Sites are a feature in Microsoft SharePoint Online that allow organizations to connect and organize multiple SharePoint sites into a centralized hub. Hub Sites provide a way to group related sites (such as team sites or communication sites) under a single umbrella, enabling better navigation, consistent branding, and streamlined content management
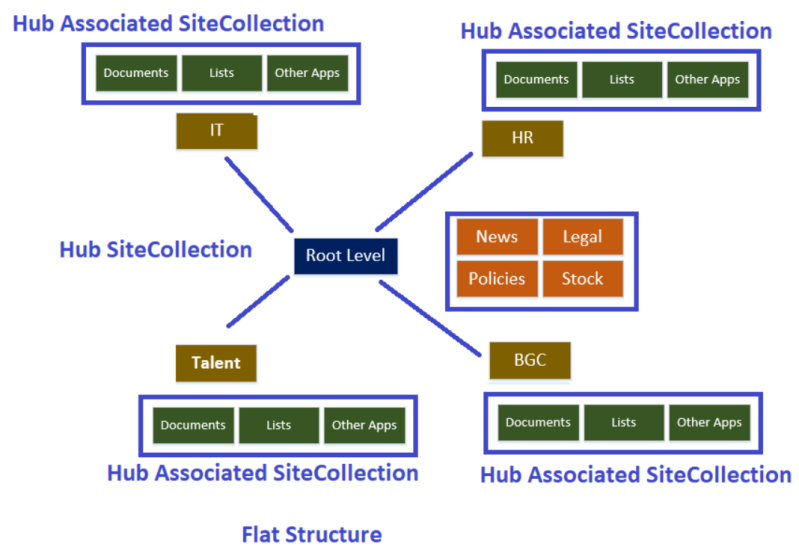
A hub site acts as a central point that connects associated sites, allowing users to discover related content, share common navigation, and apply consistent theming across all connected sites. Each hub site can have multiple associated sites, but a site can only be associated with one hub at a time.
Benefits of SharePoint Hub Sites
Hub sites offer several advantages for organizations looking to improve collaboration, communication, and content organization. Below are the key benefits:
Unified Navigation:
- Hub sites provide a consistent navigation experience across all associated sites. The hub site’s top navigation bar is inherited by all connected sites, making it easier for users to move between related sites without confusion.
Centralized Content Aggregation:
- Hub sites aggregate news, events, and content from associated sites into a single, centralized view. For example, news articles posted on any associated site can be displayed on the hub site’s homepage, ensuring users stay informed about relevant updates.
Consistent Branding
- Hub sites allow administrators to apply consistent theming (logos, colors, and layouts) across all associated sites, reinforcing organizational branding and improving the user experience.
Improved Discoverability:
- Search capabilities are enhanced within a hub site, as users can search for content across all associated sites from the hub. This makes it easier to find relevant documents, news, or resources.
Scalable Architecture:
- Hub sites provide a flexible, scalable way to organize SharePoint sites. As organizations grow or restructure, new sites can be added to a hub, or existing sites can be reassociated with different hubs.
Streamlined Permissions Management:
- While permissions for individual sites are managed separately, hub sites allow administrators to manage overarching settings and policies from a central location, reducing administrative overhead.
Enhanced Collaboration:
- By connecting related teams and projects under one hub, teams can share resources, news, and updates more effectively, fostering better collaboration across departments or initiatives.
How to Use SharePoint Hub Sites
Using SharePoint Hub Sites involves setting up the hub, associating sites, and configuring features to maximize their benefits. Below is a step-by-step guide to creating and managing hub sites.
Prerequisites
- Ensure you have administrative access to SharePoint Online (typically as a SharePoint Administrator or Global Administrator in Microsoft 365).
- Verify that the sites you want to associate with the hub are created as modern SharePoint sites (team sites or communication sites).
Creating a Hub Site
- Log in to the Microsoft 365 Admin Center (admin.microsoft.com).
- Navigate to SharePoint Admin Center > Active Sites.
- Select or Create a Site:
- Choose an existing modern site (team or communication site) to convert into a hub site, or create a new site.
- To create a new site, go to Create > Communication Site or Team Site, and follow the prompts to set it up.
- Select or Create a Site:
Register as a Hub Site:
- In the SharePoint Admin Center, select the site you want to make a hub.
- Click Hub > Register as hub site.
- Provide a name for the hub site and confirm.
- Note: Only SharePoint administrators can register a site as a hub.
Associating Sites with the Hub
- Navigate to Active Sites:
- In the SharePoint Admin Center, go to Active Sites.
- Select Sites to Associate:
- Choose the site(s) you want to associate with the hub.
- Click Hub > Associate with a hub, then select the hub site from the dropdown menu.
- Confirm Association
- Once associated, the site inherits the hub’s navigation and theme (if configured).
- Note: A site can only be associated with one hub at a time. To change a site’s hub association, you must first disassociate it from its current hub.
- Select Sites to Associate:
Configuring the Hub Site
- Customize Navigation:
- Access the hub site and edit the top navigation bar to include links to associated sites, external resources, or other relevant pages.
- Save changes to propagate the navigation to all associated sites.
- Apply Branding:
- Customize the hub site’s theme (colors, logo, etc.) via Settings > Change the look > Theme.
- The theme will automatically apply to all associated sites.
- Add Web Parts:
- Use web parts like News, Events, or Highlighted Content to aggregate content from associated sites on the hub site’s homepage.
- Configure these web parts to display content dynamically based on filters or metadata.
Managing Content and Permissions
- Content Aggregation:
- Use the News web part to roll up news articles from associated sites.
- Use the Events web part to display a consolidated calendar of events from all associated sites.
- Permissions:
- Hub site permissions are managed at the hub level, but associated sites retain their individual permission settings.
- To grant hub-level access, go to Settings > Site Permissions on the hub site and assign roles (e.g., Owner, Member, Visitor).
Using Hub Sites as an End User
- Navigation: Access the hub site to view the shared navigation bar, which links to all associated sites.
- Search: Use the search bar on the hub site to find content across all associated sites.
- Content Discovery: Browse news, events, and documents aggregated on the hub site’s homepage.
Best Practices
- Plan Your Hub Structure: Map out your site hierarchy before creating hubs to ensure logical groupings (e.g., by department, project, or region).
- Limit the Number of Hubs: Avoid creating too many hub sites to prevent navigation complexity.
- Use Descriptive Names: Name hub sites clearly to reflect their purpose (e.g., “HR Hub,” “Project Management Hub”).
- Regularly Review Associations: Periodically check associated sites to ensure they align with the hub’s purpose.
- Leverage Analytics: Use SharePoint’s built-in analytics to monitor hub site usage and engagement.
Disassociating or Deleting a Hub Site
- Disassociate a Site:
- In the SharePoint Admin Center, select the associated site.
- Click Hub > Disassociate from hub.
- Unregister a Hub Site:
- Select the hub site in the SharePoint Admin Center.
- Click Hub > Unregister as hub site. This will disassociate all connected sites and revert the hub to a regular site.
Example Use Cases
- Departmental Hub: An HR department creates a hub site to connect team sites for recruitment, training, and employee engagement.
- Project Hub: A project management office sets up a hub site to link sites for individual projects.
- Regional Hub: A global organization creates hub sites for each region, connecting sites for region-specific content.
Conclusion
SharePoint Hub Sites are a powerful tool for organizing and connecting SharePoint sites within an organization. By providing unified navigation, consistent branding, and content aggregation, hub sites enhance collaboration and streamline access to information.
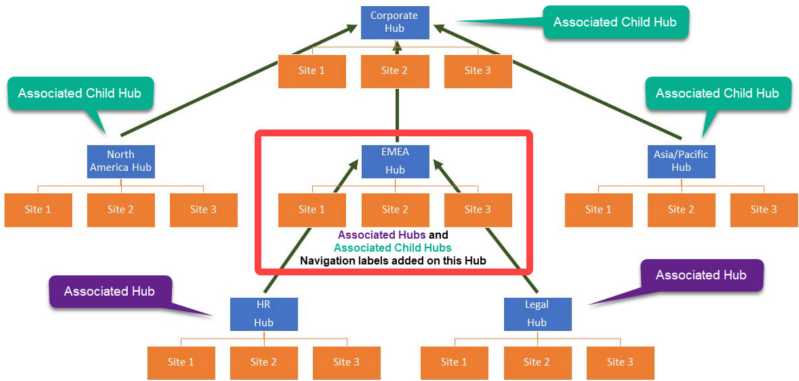
Handy Diagrams