The Countdown Timer Web Part is a built-in feature in SharePoint Online (part of Microsoft 365) that allows users to display dynamic timers on modern pages. It's particularly useful for time-sensitive communications and engagement.
Here are some key benefits:
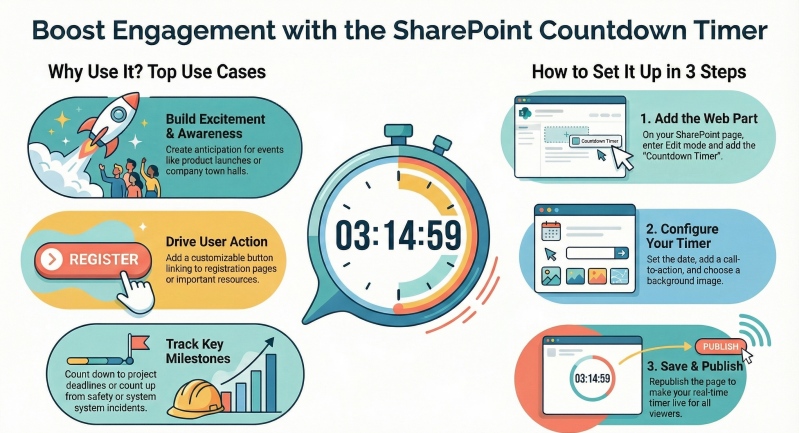
- Builds Excitement and Awareness: It creates anticipation for upcoming events like company town halls, product launches, holidays, or team-building activities by showing real-time remaining time, keeping users informed and engaged.
- Supports Project Management: Helps track deadlines, such as project milestones or submission due dates, ensuring team alignment and focus on priorities.
- Enhances Safety and Compliance Tracking: Use it in "count up" mode to display days since the last incident (e.g., workplace accident or IT outage), promoting a culture of safety and continuous improvement.
- Facilitates Training and Adoption Reminders: Highlights time elapsed since implementation (e.g., days since SharePoint rollout without formal training), encouraging ongoing education or highlighting adoption gaps.
- Informs About Disruptions: Provides countdowns to maintenance windows or system downtimes, reducing surprises for users and allowing better planning.
- Drives Action: Includes a customizable call-to-action (CTA) button with links to registration pages, resources, or forms, turning passive viewing into active participation.
- Improves Visual Appeal and Readability: Supports background images with overlay options for better text contrast, making pages more modern and user-friendly without needing custom development.
- Easy and Flexible: No coding required; it's responsive across devices and integrates seamlessly with other web parts on SharePoint pages.
This web part is exclusive to the cloud-based SharePoint Online environment.
How to Use the Countdown Timer Web Part - Adding and configuring the web part is straightforward and takes just a few minutes. Here's a step-by-step guide:
- Navigate to Your Page: Go to the SharePoint site and open the modern page where you want to add the timer (e.g., the homepage or a dedicated event page). If creating a new page, select New > Page from the site contents.
- Enter Edit Mode: Click Edit in the top-right corner of the page to enable web part insertion.
- Add the Web Part:
- Click the + icon in a section of the page (or between existing web parts).
- Under Built-in, select See all web parts (or search for "Countdown").
- Choose Countdown Timer from the list and click Add (or drag it into place).
- Configure the Properties:
- A properties pane will appear on the right. Here's what to set:
- Title: Enter a descriptive title (e.g., "Annual Team Retreat") directly in the web part or via the pane.
- Date and Time: Pick the target date/time using the calendar picker. For future events, it counts down; for past dates, it automatically switches to "count up" mode (e.g., time elapsed since an anniversary).
- Time Display: Choose the format—e.g., days only, or full breakdown (days, hours, minutes, seconds).
- Description: Add optional explanatory text below the title.
- Call to Action: Toggle on to include a button. Set the button text (e.g., "Register Now") and link it to a URL, document, or another page.
- Background Image: Upload or select an image for visual flair. Adjust overlay color and opacity to ensure text readability.
- Preview changes in real-time as you edit.
- A properties pane will appear on the right. Here's what to set:
- Save and Publish: Once configured, click Republish (or Save and close) at the top-right to make the page live. The timer will update automatically in real-time for all viewers.
Tips for Best Results
- Test on mobile devices to ensure responsiveness.
- Combine with other web parts like Events or News for a fuller event promotion.
- For multiple timers (e.g., various deadlines), add the web part several times on the same page.