The Embed Web Part is a built-in feature in SharePoint Online (available only in modern pages) that allows you to integrate external content directly into your SharePoint pages using an iframe. This enhances collaboration and content richness without needing custom development.
Here are some key benefits:
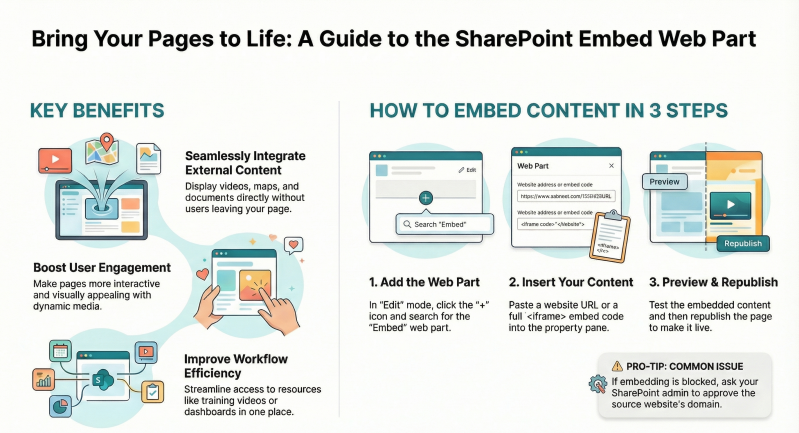
- Seamless Integration of External Content: You can display dynamic media like YouTube videos, Vimeo clips, Bing Maps, Flickr images, or Scribd documents directly on your page, making it easier to share multimedia without leaving the SharePoint environment.
- Enhanced User Engagement: By embedding interactive elements (e.g., videos or maps), pages become more visually appealing and interactive, improving user experience and reducing the need to switch between tabs or apps.
- Time and Workflow Efficiency: Instead of linking to external sites, content is presented inline, streamlining access to resources like training videos, event maps, or dashboards. This supports quick information sharing in team sites or communication sites.
- Security and Isolation: The iframe wrapper protects your SharePoint page from potential malicious scripts on the embedded site, ensuring safer content display.
- Customization and Flexibility: Supports both simple URLs and full embed codes, allowing tailoring to specific needs, such as embedding calendar views or third-party APIs (with admin approval).
- No Additional Tools Required: It's out-of-the-box, reducing costs and setup time compared to custom web parts or third-party add-ons.
Note that embedding is restricted to sites that explicitly allow it, and admins can control allowed domains for compliance.
Using the Embed Web Part is straightforward and requires edit permissions on the page. Here's a step-by-step guide:
- Navigate to Your SharePoint Page: Go to the modern SharePoint site and open the page where you want to add the content. If creating a new page, select New > Page and choose a template.
- Enter Edit Mode: Click Edit in the top-right corner to enable editing.
- Add the Web Part:
- Hover over an existing web part (or the top/bottom of the page) to see a + icon.
- Click the + and search for "Embed" in the web part gallery.
- Select the Embed web part to insert it.
- Insert the Content:
- In the web part's property pane (on the right), paste either:
- A website address (URL): For simple embeds, like https://www.youtube.com/watch?v=example.
- Embed code: Copy the full <iframe> code from the source site (e.g., from YouTube's "Share > Embed" option) and paste it into the text box.
- Click Preview to test, then Republish the page to save changes.
- In the web part's property pane (on the right), paste either:
- Troubleshoot Common Issues:
- If you see an error like "Embedding content from this website isn't allowed," contact your site admin. They can approve the domain via the SharePoint admin center: Go to Settings > Site permissions > Site collection app permissions, or use PowerShell to extend the allowed list.
- Ensure the source site supports embedding (e.g., YouTube does, but not all sites).
- For SharePoint spaces (immersive 3D pages), embeds appear as thumbnails that expand in inspect mode.
Example: Embedding a YouTube Video
- Go to YouTube, play the video, click Share > Embed, and copy the <iframe> code.
- Paste it into the Embed Web Part's text box.
- Result: The video plays inline on your SharePoint page.
This web part works best for read-only embeds; for advanced interactions, consider connecting it to other web parts like the File Viewer. If you need to embed internal organizational pages or custom HTML, admins may need to adjust framing settings. For more details, check Microsoft's official documentation.