Guide to Using the Document Library Web Part in SharePoint Online
The Document Library web part is a powerful modern web part in SharePoint Online that lets you embed a fully interactive view of a document library directly on any modern page. It is ideal for team sites, communication sites, and hub sites where you want to surface key documents without forcing users to navigate away to Site Contents.
Users with appropriate permissions can upload, open, edit, delete, pin, sort, filter, and interact with files right inside the web part.
Key Benefits
- Keeps important documents front-and-center on landing pages.
- Supports dynamic connections (e.g., click a file → preview in a File and Media web part).
- Works with custom views you create in the library (list view, tiles, board view via metadata, etc.).
- Responsive design – works great on desktop, tablet, and mobile.
Important Notes
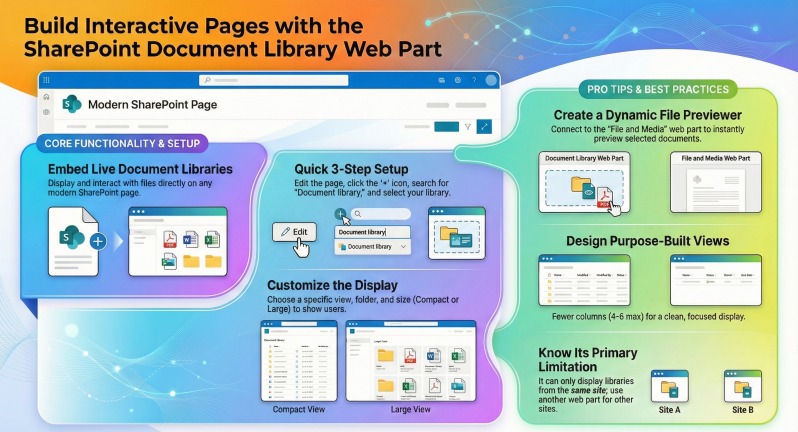
- The web part can only display document libraries from the same site (not cross-site or from other site collections). Use the Highlighted content web part for cross-site needs.
- Some library commands (e.g., Add shortcut to OneDrive, Pin to Quick access) are not available inside the web part – users must click See all to go to the full library for those actions.
- The web part respects library permissions exactly – users see only what they have access to.
How to Add the Document Library Web Part
- Navigate to the modern page where you want to add the library (or create a new page).
- Click Edit at the top right of the page.
- Hover over a section and click the + button to add a web part.
- Search for “Document library” or find it under the Files & media category.
- Select the Document library web part – SharePoint will prompt you to choose a library.
- Select the desired document library from the current site.
- (Optional but recommended) Immediately click the pencil icon (Edit web part) on the left of the web part to configure it (see below).
- When finished, click Republish (or Publish) at the top right.
Configuring the Web Part (Edit Web Part Settings)
After adding the web part, click the pencil icon to open properties:
- Options / Description
- Document library
- Change the source library (only libraries in the current site appear).
- Select any existing view from the library (All Documents, custom views you created, etc.). Recommended: Create narrow custom views for pages (fewer columns, grouped, or filtered) to avoid horizontal scrolling.
- Folder
- Optionally show only a specific folder or subfolder. Type the folder path, e.g., Projects/2025 Q4 or Shared Documents/Contracts/Active. Use "/" for nested folders.
- Compact (smaller rows, more items visible) Large (bigger thumbnails/tiles, better for communication sites)
- Turn on/off the New / Upload / Sync etc. toolbar (usually keep on).
- Enables bulk actions inside the web part.
- You can give the web part a friendly title instead of the library name.
Tip for site owners:
- Always create and test your custom view in the actual library first, then republish the page – new views do not appear in the dropdown until the page is saved/published.
- What Users Can Do Inside the Web Part
- Users interact with the library exactly like in the full view (with minor exceptions noted above):
- Switch between Details (list view) and Tiles (gallery view) using the buttons in the top-right of the web part.
- New → Create folders, Office files, PDFs, etc.
- Upload → Files or entire folders.
- Drag-and-drop files directly into the web part to upload.
- Select files → Download, Delete, Rename, Move, Copy, Pin to top, Share, etc.
- Sort, filter, group, or change columns just like in the full library (click column headers).
- Click See all (top right) to open the complete library in a new tab.
All changes happen in real time and are reflected immediately in the actual library.
Dynamic Connections – Make It Interactive
- One of the most powerful features is connecting the Document Library web part to other web parts.
Most Common & Useful Connection
- Document Library → File and Media web part (preview selected file)
- Add both web parts to the page (place File and Media below or beside the library).
- Edit the File and Media web part.
- In the properties pane, under Connect to source, select your Document Library web part.
- Close the pane and republish.
- Now when a user clicks any file in the library web part, it automatically previews in the File and Media web part (supports Office files, PDFs, images, videos, etc.).
This creates a beautiful “document browser + preview” experience without leaving the page – perfect for knowledge bases, onboarding pages.
Other possible connections (2025):
- Connect to List properties web part to show metadata of the selected file.
- Connect to Power BI or Power Apps web parts if they support dynamic data.
Best Practices & Tips for Site Owners
- Create dedicated views for pages
Use fewer columns (4–6 max).
Group by status, department, or year.
Use formatted columns (JSON) for icons, progress bars, or conditional coloring. - Use the Folder option to surface only a specific subfolder (great for project sites where you want only “Current Project Files”).
- Combine with Highlighted content web part on hub/home pages to show “Recent Documents Across the Site” and use Document Library web part on department pages for their specific library.
- For very large libraries (>5,000 items), create indexed columns and filtered views to ensure performance inside the web part.
- Turn off the command bar if you want a read-only showcase (e.g., public policies page).
- Use Large size + Tiles view for visual impact on communication sites.
- If you need to show libraries from other sites, use the Highlighted content web part with source = “This site” or “Select sites” and layout = “List” or “Carousel”.
Limitations
- Cannot display libraries from other site collections or tenants.
- Some command bar options missing (Add shortcut to OneDrive, Pin to Quick access, some Automate options).
- Board view (Kanban) is not available inside the web part – users must go to the full library.
- No built-in ability to show multiple libraries in one web part (use Highlighted content instead).
The Document Library web part is one of the most frequently used web parts in modern SharePoint because it turns static pages into live, interactive document hubs. Master it, combine it with views and connections, and your pages will become dramatically more useful.