The Divider Web Part
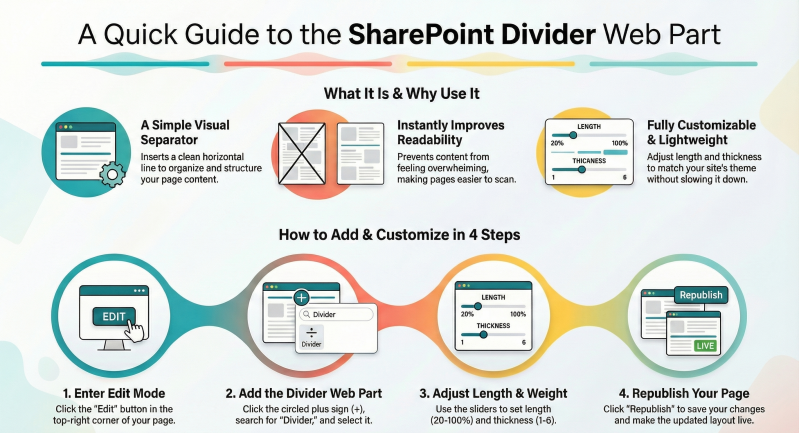
The Divider web part is a simple yet effective component available in SharePoint Online (and other supported environments like SharePoint Server Subscription Edition and SharePoint Server 2019) for modern pages. It inserts a horizontal line (or "divider") between other web parts, acting as a visual separator to organize content and enhance the overall layout of your page. This helps break up dense or lengthy sections, making the page feel more structured without adding text or interactive elements.
Benefits
- Improved Readability: By visually separating sections, it prevents content from feeling overwhelming, allowing users to scan and navigate pages more easily ideal for reports, dashboards, or instructional pages.
- Enhanced Page Organization: It provides a clean, professional look without clutter, complementing other layout tools like sections and columns.
- Customization Flexibility: You can adjust the line's length and thickness to match your page's design, ensuring it integrates seamlessly with themes and branding.
- Simplicity and Performance: As a lightweight web part, it loads quickly and doesn't require external data sources, making it suitable for high-traffic sites.
How to Use It
Adding and customizing the Divider web part is straightforward and done directly on a modern SharePoint page.
Here's a step-by-step guide:
Step 1: Enter Edit Mode
- If your page isn't already in edit mode, click Edit in the top-right corner of the page.
Step 2: Add the Divider Web Part
- Hover your mouse above or below an existing web part (or under the page title region) where you want to insert the divider.
- Click the circled plus sign (+) that appears.
- In the web part toolbox that opens, search for "Divider" or scroll to find it under the "Layout" category.
- Select the Divider web part to insert it. It will appear as a default horizontal line.
Step 3: Customize the Divider (Optional)
- Click the Edit web part pencil icon (on the left side of the web part toolbar) to open the customization pane.
- Adjust Length: Use the slider to set the line's length from 20% to 100% of the page width. Changes preview in real-time on the page.
- Adjust Weight: Use the slider to set the thickness from 1 (thinnest, subtle line) to 6 (thickest, bold separator). Again, previews update live.
- The divider inherits your site's theme colors by default but can be fine-tuned for specific visual needs.
- Click Republish (or save and close if drafting) to apply changes.
Step 4: Delete the Divider (If needed)
- Ensure you're in edit mode.
- Select the Divider web part by clicking on it.
- Click the Delete web part trash icon (on the left of the toolbar).
- Confirm the deletion, then republish the page.
Tips:
- Use multiple dividers sparingly to avoid over-segmentation.
- Combine with the Spacer web part for vertical padding if you need more whitespace.
- Permissions: You need edit access to the page to add or modify web parts.